Bug Busters - Test Driven Development in .NET
15 March 2008 - .NET
"The quality is remembered long after the price is forgotten."
Sir Frederick Henry Royce (1863 - 1933; co-founder of Rolls-Royce Motor Cars).
Abstract
In this article Rainer Stropek and Karin Huber show how Test Driven Development (TDD) works in practice. They start with a general overview about quality assurance and testing in software development. After that they implement an end-to-end solution using the TDD philosophy. Karin and Rainer do not only use unit tests for validating the data access and business layer. They also demonstrate how the popular open source tool WatiN can be used to test-driven develop a web user interface. The sample uses Microsoft Visual Studio 2008, C# 3.0, Linq-to-SQL, Linq-to-Objects, Visual Studio Unit Tests, ASP.NET and WatiN.
- Introduction
- Quality Assurance vs. Testing
- Testing
- Test Automation and Test Driven Development
- The Sample, Part 1 - Preparation phase
- The Sample, Part 2 - Basic Unit Tests for Data Access Layer
- The Sample, Part 3 - Adding Business Logic
- The Sample, Part 4 - A Short Introduction in WatiN
- The Sample, Part 5 - Test Driven Development of Web UI
- The Sample, Part 6 - WatiN Special Topics
- Summary
Introduction
Quality assurance is an important issue in software development, do you agree? Of course you do, don't you? Why is it that this topic is so hot for those of us who have been in this business for a long time (and who want to stay in it for another few years)? When I did the session that was the basis for this article at Spring BASTA! 2008 in Frankfurt I asked this question to the audience. The answers I got were all very similar. The participants said that customer satisfaction is important. Some of the people came up with more sales-oriented versions of the answers (something like "high quality leads to happy customers which again leads to higher revenue") and others came up with an answer that was primarily driven by support issues (e.g. "lower support costs" or "less uncomfortable phone calls with annoyed customers").
I want to rephrase all these answers a little bit: Customers rely on our software, they need it working. It is our responsibility not to disappoint their trust in the software products we produce. However, beside customer satisfaction there are quite a few other arguments why companies need to focus on quality issues in software development: Some face tough legal regulations, some have to think of product liability issues, etc. The problem is that we do not get a constantly high software quality for free. The appropriate measures take time, they cost money and last but not least things like quality management and testing are not as funny as developing the software system itself.
Quality Assurance vs. Testing
Does the following fictitious dialog between a project manager and his boss ring a bell to you?
Project Manager: "Hey boss, we will finish this enormously large and important project in a few weeks! Our customer told us more than once that he needs high quality software. What can we do?"
Boss: "Hmmm. We pay our developers such a vast amount of money each month. Tell them how important this project is for our company. They have to think and work even harder than usual."
Project Manager: "We will all do our very best but I read in a lot of books that developers should not test their own code."
Boss: "Ok. We will get a holiday intern next week and we could even hire a few more. They should press every single button in the application and make sure that no error appears."
Testing is a part of all possible QA activities. In Wikipedia you can find definitions of quality assurance and testing.
What is wrong here? First the project manager and his boss want a high level of software quality (whatever "high" means in this context) in this important project. However, they onlytalk about testing! In my experience a lot of people in the software industry use "testing" as a synonym for "quality assurance". In fact testing is a part of all possible measures that can be used to assure the level of quantity that is needed in a certain situation. If you really want to guarantee the achievement of a certain level of quality you have to rethink the development process as a whole:
If you are looking for inspiration for great quality assurance activities check out this GREAT book:
I. M. Wright's Hard Code (Best Practices)
Eric Brechner
Microsoft Press, ISBN-13 978-0735624351
-
How do you write specification?
I recommend following the "breadth first" approach. Define the system you have to build as a whole on a very high level of abstraction. Afterwards form specialized teams who specify, implement, test and document one feature after the other. -
Beware of over-engineering
"Why not tweaking this central algorithm of you business logic one day before shipping? There are not performance problems in this area - doesn't matter, the solution just is not elegant enough!" Things like that must not happen! -
Make sure that everyone knows how important quality assurance is
Using a holiday intern for testing because he has nothing else to do in the moment is not an appropriate quality assurance strategy! -
Make sure that the roles of developers and testers are clearly stated
Developers have to strive for perfect bug-free code - even though testers take a look at the work they produced before it reaches the customer. -
Collect data and use it
Collect data about how many bugs are produced per 1,000 lines of code, how many hours are used for bug fixing and re-testing, etc. Think about appropriate quality measures that fit you specific needs. Use the data to find out if you and your team get better. Use it to make statistical prediction about the number of bugs that are in the software solutions you deliver... - ...
Testing
It is a rumor that the word "bug" has been introduced for computer problems in 1947 when the Mark II computer at Harvard University was fixed by removing a moth trapped between points at a relay. However, the word bug had been used long before that date (see Wikipedia for details about the word "bug").
Whenever we talk about testing in the software industry we usually mean the process of running a program with the goal to find error (=bugs). You can distinguish various types of error (I am sure you can find additional error categories or other ways of categorizing error; this is how I structure my personal "little shop of horrors"):
-
Syntax error
Handled by the compiler -
Runtime errors
A program shows some kind of unwanted behavior (e.g. system crash, memory leak, etc.) -
Logical errors
A wrong method of resolution was chosen or an algorithm was implemented incorrectly. The system does not behave according to the specification. -
Design errors
Error in the general software design which was the basis for implementing the system. -
Usability problems
The application behaves different from what users expect. -
Regression errors
Error that did not exist in prior releases or have been fixed already in the past.
Different types of software tests can be used to find errors in the categories mentioned above. The problem with all types of tests is that they are very time-consuming and therefore expensive. Even if you decide to invest the necessary amount of time and money to test your software system before the initial launch there will come a point in time where you have to change something. If you are serious with testing you have to re-test your complete application (or at least large parts of it) after every change. If your software product is successful you will find more and more customers. As a natural consequence testing gets more and more important because each error in a software version that is out at your customers' computers is much more costly than the correction of an error that has been found during the test phase.
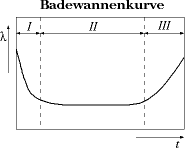
Typical development of failure rate (y-coordinate) of systems over time (x-coordinate). Source:
Wikipedia
Additionally you have to be aware of the fact that you software is aging! Over time you will be forced to extend your software in ways that do not perfectly fit in your original design just because one very large customer demands it. Your customers will do things with your software you have never dreamed of and they will use it in ways that you never wanted it to be used. As a consequence the upgrade process gets harder and harder. It is natural that the frequency of bugs rises as your software ages.
You are in a vicious circle! Producing a software product with high quality makes you successful. The more successful you get the harder it is to keep the level of quality high. You have to have a strategy for handling this situation if you want to be successful in the software business over a long period of time. One possible strategy out of this is automating tests.
Test Automation and Test Driven Development
The idea is simple: Tests should not be done manually by human beings but automatically by software-based test robots. The hard thing is the creation of automated tests. On first sight the easiest way to create an automated test is to capture all the steps that a human tester performs, add some validation code and replay the test over and over again. This is a possible way to automate testing and there are a lot of programs on the market that support this capture/replay scenario.
If you build web applications based on Microsoft's ASP.NET technology you could for instance use Visual Studio Web Tests. Microsoft Visual Studio contains a recorder that is able to capture all HTTP requests that get sent to the web server running your application. After you have recorded the traffic you can enhance the test script with some extra logic (e.g. validation, extraction of variable values, etc.) and make your test more generic (e.g. by reading test data from a database and using this data as input for you test cases). It really works very well. However, there are a few drawbacks if you decide to go with Visual Studio Web Tests:
Read more about Microsoft Visual Studio Team System 2008 Test Edition on MSDN.
- You need Visual Studio Team System 2008 Test Edition; Professional Edition is not sufficient.
- Your application needs to exist before you can capture the test
(in theory it is possible to build web tests by hand; in my experience that is not practically feasible) - Whenever you change your application you have to re-capture your tests
(in theory it is possible to change web tests by hand; in my experience it is more efficient to re-capture the whole test most of the times) - Visual Studio simulates the existence of a browser by just sending HTTP requests to the web server. JavaScripts and/or other active content that is normally executed by the browser is completely ignored. Therefore Visual Studio Web Tests cannot be used to automatically test e.g. JavaScript code.
- For some reasons the recorder for web tests does not work on some of our development machines. We do not have an idea what could be the reason for that.
If you really want to bake test automation into your development process the biggest drawback of VS Web Tests is the second one: You are forced to implement your program before you start creating tests. The idea to turn this sequence upside down and develop automated tests (also called "unit tests") is called "Test Driven Development" (TDD):
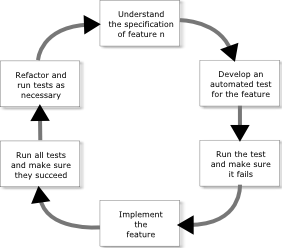
Test Driven Development Process
This kind of development process offers a lot of advantages over the traditional develop-first-test-afterwards approach. Here are some of them:
Read an interesting study on the Effectiveness of Test-first Approach in Proceedings of the IEEE Transactions on Software Engineering.
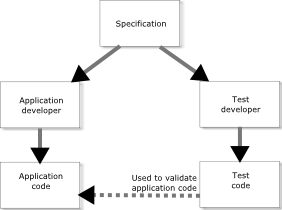
- If a single developer runs through the whole process she has to deal with the specification before writing the corresponding code. The chance is high that she detects inconsistencies in the specification already while writing the tests.
- If more than one developer handles a single feature they can split up and develop test and application code in parallel. In this case both of them interpret the specification more or less independent from one another.
- Do not underestimate the feeling of success that comes with seeing the test succeed after the application code has been written. I guarantee that you will see programmers with smiling faces in your office just because Visual Studio gave them a green check on their automated test. You will seldom experience that if you stay with the Develop-First-Test-Later approach.
Usually it is comprehensible for most people that TDD works for data access and business logic layer components. However, using the right tools TDD can also be a very powerful method in user interface development, too. In the rest of the article we want to show you how TDD works by walking you through an end-to-end solution including a web-based user interface (ASP.NET). The sample uses the following tools and technologies:
I use CaseComplete from Serlio because I think it is a great tool for analysts to do requirement elicitation and management. Of course you could do the same using other tools or even Microsoft Word.
- Tools
- Visual Studio 2008 Professional Edition
- CaseComplete by Serlio Software
- WatiN for UI test automation
- Technologies
- C# 3.0 as the programming language of choice (I apologize to all the VB developers, I have no knowledge of VB but I hope you are able to translate the code to your favorite language)
- SQL Server for data storage
- Linq-to-SQL for data access
- Linq-to-objects in test implementation
- ASP.NET for building the web UI
The Sample, Part 1 - Preparation phase
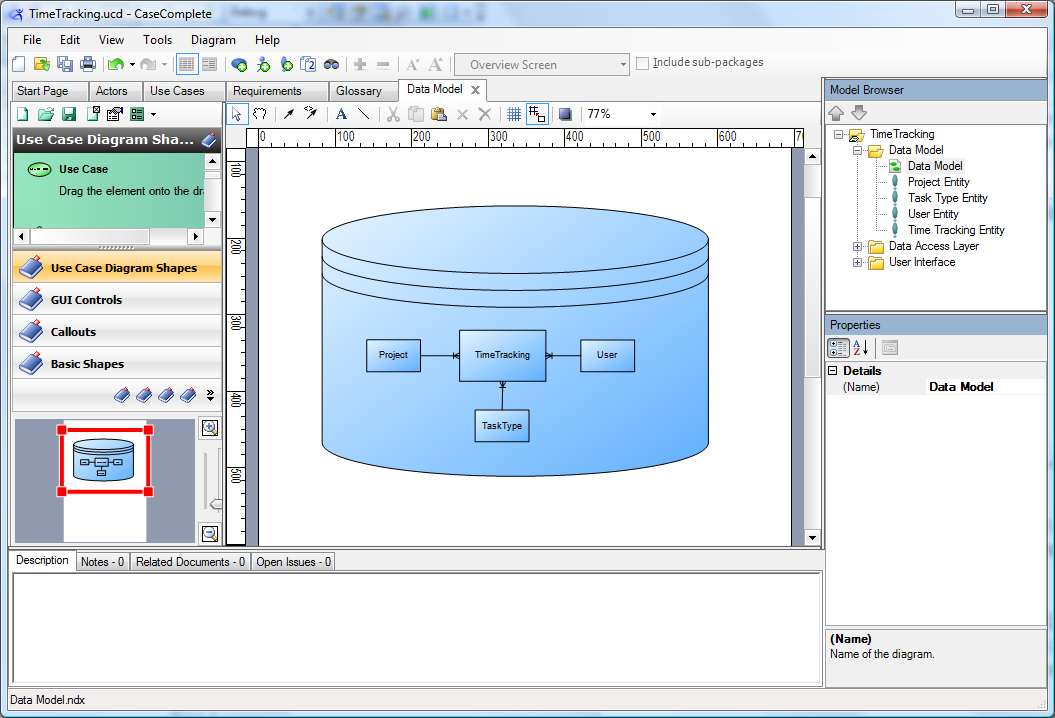
Business data model in the specification
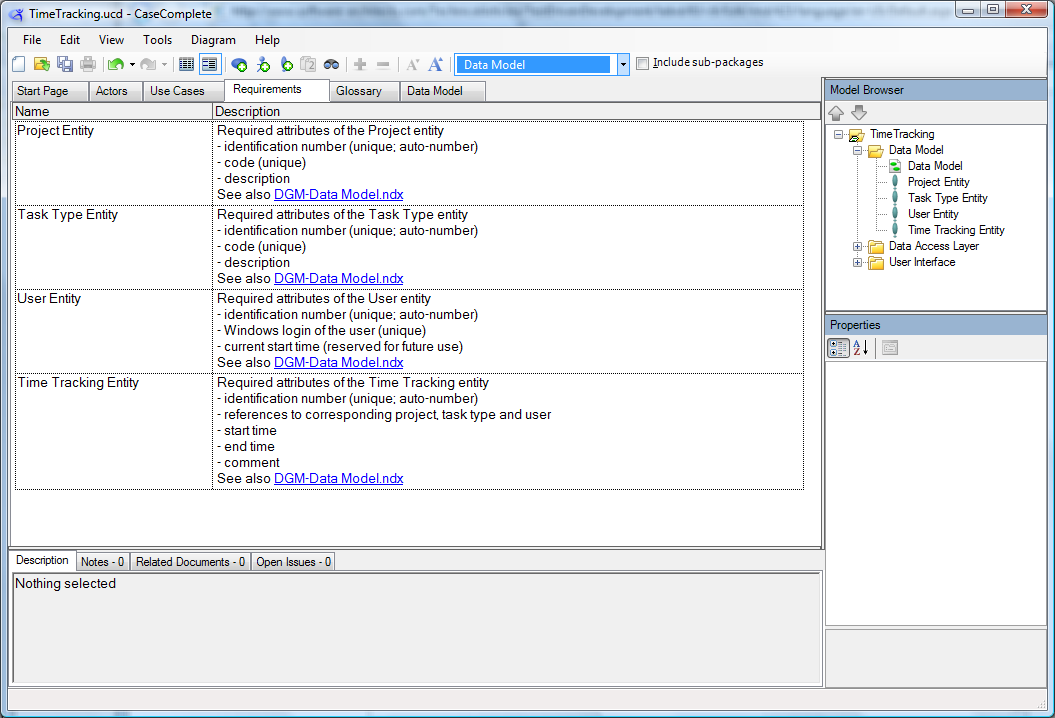
Detailed specification of entities
We start our example for Test Driven Development with the specification. In our fictitious project we received a specification from a business analyst. The specification tells us that we have to build a web-based solution for time tracking. Fortunately the analyst defined the business data model quite detailed. We have no problem translating the business data model into a few SQL Server tables.
USE [TddSample_TimeTracking]
GO

CREATE TABLE [dbo].[Project](
  [ProjectId] [int] IDENTITY(1,1) NOT NULL,
  [ProjectCode] [varchar](20) NOT NULL,
  [ProjectDescription] [nvarchar](max) NULL,
  CONSTRAINT [PK_Project] PRIMARY KEY CLUSTERED
    ( [ProjectId] ASC )
)
CREATE UNIQUE NONCLUSTERED INDEX [IX_Project_ProjectCode] ON [dbo].[Project]
  ( [ProjectCode] ASC )

CREATE TABLE [dbo].[TaskType](
  [TaskTypeId] [int] IDENTITY(1,1) NOT NULL,
  [TaskTypeCode] [varchar](20) NOT NULL,
  [TaskTypeDescription] [nvarchar](max) NULL,
  CONSTRAINT [PK_TaskType] PRIMARY KEY CLUSTERED
    ( [TaskTypeId] ASC )
)
CREATE UNIQUE NONCLUSTERED INDEX [IX_TaskType_TaskTypeCode] ON [dbo].[TaskType]
  ( [TaskTypeCode] ASC )

CREATE TABLE [dbo].[User](
  [UserId] [int] IDENTITY(1,1) NOT NULL,
  [WindowsLogin] [varchar](128) NOT NULL,
  [CurrentStartTime] [datetime] NULL,
  CONSTRAINT [PK_User] PRIMARY KEY CLUSTERED
    ( [UserId] ASC )
)
CREATE UNIQUE NONCLUSTERED INDEX [IX_User_WindowsLogin] ON [dbo].[User]
  ( [WindowsLogin] ASC )

CREATE TABLE [dbo].[TimeTracking](
  [TrackingId] [int] IDENTITY(1,1) NOT NULL,
  [ProjectId] [int] NOT NULL,
  [TaskTypeId] [int] NOT NULL,
  [UserId] [int] NOT NULL,
  [StartTime] [datetime] NOT NULL,
  [EndTime] [datetime] NOT NULL,
  [Comment] [nvarchar](max) NULL,
  CONSTRAINT [PK_TimeTracking] PRIMARY KEY CLUSTERED
    ( [TrackingId] ASC )
)
ALTER TABLE [dbo].[TimeTracking] WITH CHECK ADD CONSTRAINT [FK_TimeTracking_Project] FOREIGN KEY([ProjectId]) REFERENCES [dbo].[Project] ([ProjectId])
ALTER TABLE [dbo].[TimeTracking] CHECK CONSTRAINT [FK_TimeTracking_Project]

ALTER TABLE [dbo].[TimeTracking] WITH CHECK ADD CONSTRAINT [FK_TimeTracking_TaskType] FOREIGN KEY([TaskTypeId])
REFERENCES [dbo].[TaskType] ([TaskTypeId])
ALTER TABLE [dbo].[TimeTracking] CHECK CONSTRAINT [FK_TimeTracking_TaskType]

ALTER TABLE [dbo].[TimeTracking] WITH CHECK ADD CONSTRAINT [FK_TimeTracking_User] FOREIGN KEY([UserId]) REFERENCES [dbo].[User] ([UserId])
ALTER TABLE [dbo].[TimeTracking] CHECK CONSTRAINT [FK_TimeTracking_User]
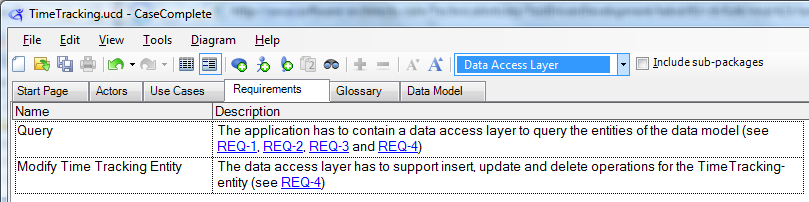
Data access layer requirements
In addition to the data model the specification demands a data access layer that can be used to query all entities and insert, update and delete entities in the time tracking entity. Looks like the analyst who wrote the specification has at least some knowledge in IT, doesn't it?
We decided to use Linq-to-SQL to implement the data access layer. In pure TDD we would have to write tests for the feature we currently focus on. I would have to write test code that would not even compile because up to now I have no classes for the entities. To be honest, in such cases I follow a more down-to-earth approach and use the code generator of Linq-to-SQL before writing test code. Doing it in this order I get convenient things like IntelliSense.
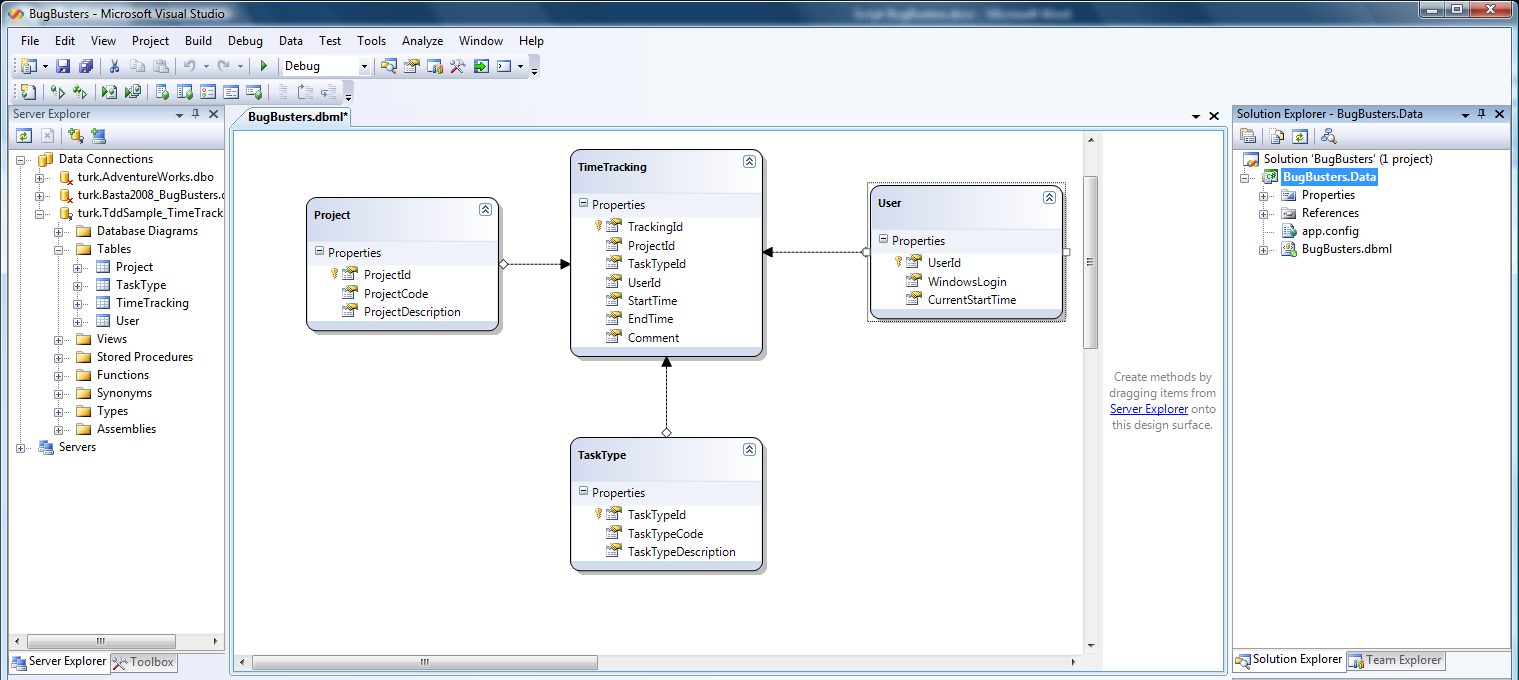
Linq-to-SQL data model
In our case
- we start by creating an empty solution,
- adding a class library to it (this library will contain the data access layer code)
- and generating a Linq-to-SQL data model for the tables shown above.
Please note that I have not written a single line of code myself! All I used was the code generator of Linq-to-SQL. According to TDD I now start to write the first unit test. It checks if insert, update and delete work for the TimeTracking-entity. I will not write test code that verifies that reading entities works because I do not have to write any code to enable this function. It is provided by Linq-to-SQL and I do not want to test the Linq-to-SQL implementation of Microsoft. However, you have to decide how far you go with your test cases based on the level of quality that you need in your specific projects.
In our case
- we add a unit test project to the solution,
- clean it up a little bit (remove unnecessary AuthoringTests.txt and ManualTest1.mht),
- rename UnitTest1.cs to DataAccessLayerTests.cs
- and add some references I need to implement my tests
- Reference to the class library with Linq-to-SQL classes created a minute ago
- System.Data.Linq
- System.Configuration (needed to read App.config file)
- System.Data
The Sample, Part 2 - Basic Unit Tests for Data Access Layer
Initialization and cleanup methods can be used to care for well defined preconditions before tests are executed. Use attributesClassInitialize/ClassCleanup andTestInitialize/TestCleanup.
It is time to write our first test! I always pay attention that my tests are independent from each other and independent from all preconditions as far as possible. Therefore I use the test initialization functions of .NET to prepare the database tables with a defined set of test data before each of the tests is run. Test initialization functions exist on class and on test level. Those on class level have to be decorated with the attributesClassInitialize/ClassCleanup, those on test level with TestInitialize/TestCleanup.
In our case
- we add an App.config file to the test project (it contains the DB connection string as well as the SQL initialization script shown below),
- add a test initialization method that opens a database connection and executes the script
- and add a test cleanup method that closes the database connection again.
Here is the SQL code I use to prepare the database:
begin tran;

delete from TimeTracking;
delete from [User];
delete from TaskType;
delete from Project;

insert into Project ( ProjectCode, ProjectDescription )
values ( 'PRJ1', 'Project 1' );
insert into Project ( ProjectCode, ProjectDescription )
values ( 'PRJ2', 'Project 2' );
insert into Project ( ProjectCode, ProjectDescription )
values ( 'PRJ3', 'Project 3' );

insert into TaskType ( TaskTypeCode, TaskTypeDescription )
values ( 'Travel', 'Time used for travelling' );
insert into TaskType ( TaskTypeCode, TaskTypeDescription )
values ( 'Programming', 'Time used for programming' );
insert into TaskType ( TaskTypeCode, TaskTypeDescription )
values ( 'Testing', 'Time used for testing' );
insert into TaskType ( TaskTypeCode, TaskTypeDescription )
values ( 'Other', 'Time used for other things' );

insert into [User] ( WindowsLogin ) values ( 'rainer' );
insert into [User] ( WindowsLogin ) values ( 'karin' );

commit;
Here is the test initialization code for the DataAccessLayerTests class:
Note that we open a Linq data context in the initialization code and close it in the cleanup method. All the tests can use the open database connection without having to care about whether it is already open. Additionally this implementation uses a single data context at a time - a recommended best practice.
#region Test initialization and cleanup code
private BugBustersDataContext db;
/// <summary>
/// Initialize test database using SQL initialization script and open data context
/// </summary>
[TestInitialize()]
public void TimeTrackingConstraintsTestInitialize()
{
    string connString = ConfigurationManager.
      ConnectionStrings["TestDatabase"].ConnectionString;
    db = new BugBustersDataContext(ConfigurationManager.
      ConnectionStrings["TestDatabase"].ConnectionString);
    db.Connection.Open();
    var cmd = new SqlCommand(ConfigurationManager.
      AppSettings["TestDatabaseInitializationScript"],
      (SqlConnection)db.Connection);
    cmd.ExecuteNonQuery();
    db.Connection.Close();
}

/// <summary>
/// Close data context after test is done
/// </summary>
[TestCleanup()]
public void TimeTrackingConstraintsTestCleanup()
{
    db.Dispose();
    db = null;
}
#endregion
After we cared for correct test data in our database we are ready to implement the test routine:
Note how we use the functions of theAssert-class here to check if the test succeeded!
[TestMethod]
public void AddSingleRow()
{
var startTime = new DateTime(2007, 1, 1, 8, 0, 0);
var duration = new TimeSpan(1, 0, 0);
var numberOfRecords = db.TimeTrackings.Count();
var tt = new TimeTracking();
tt.Project = db.Projects.First();
tt.TaskType = db.TaskTypes.First();
tt.User = db.Users.First();
tt.StartTime = startTime;
tt.EndTime = startTime + duration;
tt.Comment = "This is a test case generated during unit testing!";
db.SubmitChanges();
Assert.AreEqual(numberOfRecords + 1, db.TimeTrackings.Count());
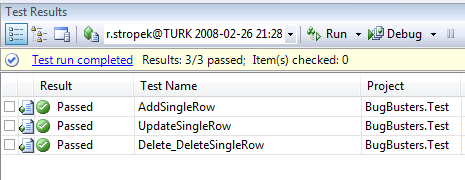
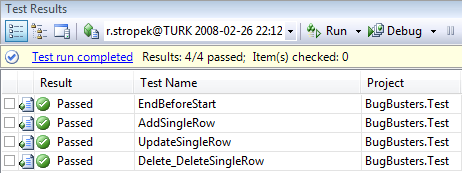
}Similarly we can build test methods for update and delete of TimeTracking entities. After that we are ready to start our first unit test. In the Test-menu of Visual Studio you can choose between Run and Debug of tests. In our case all three tests succeed because the necessary functionality was provided by Linq-to-SQL out of the box:
Download the complete solution including all the source code we built so far.
The Sample, Part 3 - Adding Business Logic
Requirements for business logic
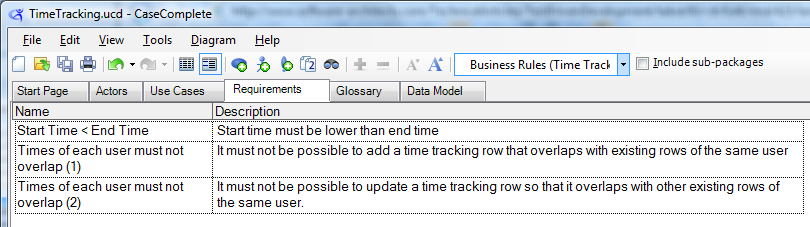
The specification contains some business logic that we have to implement. On the one hand end time must not be lower than start time. On the other hand the data access layer has to ensure that no user enters overlapping time tracking entries.
According to the TDD philosophy we must not start with writing the business logic code. We have to start with the test first!
[TestMethod]
public void EndBeforeStart()
{
    var exception = false;

    try
    {
        // try to add a time tracking row with end < start -> must not work
        AddTimeTrackingRow(new DateTime(2007, 1, 1, 9, 0, 0),
          new TimeSpan(-1, 0, 0));
    }
    catch (Exception ex)
    {
        Assert.IsInstanceOfType(ex, typeof(ApplicationException));
        Assert.AreEqual("StartTime must be lower than EndTime!", ex.Message);
        exception = true;
    }

    Assert.IsTrue(exception);
    Assert.AreEqual(0, db.TimeTrackings.Count());
}
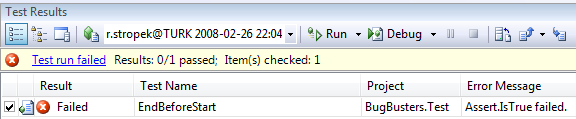
Test failed because of missing logic
Of course the test fails because we have not implemented the corresponding application logic yet.
Because we use Linq-to-SQL it is quite easy to add the appropriate business logic. We use Linq's extensibility method TimeTracking.OnValidate and add the necessary code there:
using System;
using System.Linq;
using System.Data.Linq;

namespace BugBusters.Data
{
    public partial class TimeTracking
    {
        partial void OnValidate(System.Data.Linq.ChangeAction action)
        {
            if (action == ChangeAction.Insert || action == ChangeAction.Update)
            {
                if (StartTime >= EndTime)
                    throw new ApplicationException(
                      "StartTime must be lower than EndTime!");
            }
        }
    }
}
Business logic test succeeds
Now the test succeeds!
In line with the first business rule we can now
- add a two test methods for the overlapping-business rule,
- test them and make sure they fail,
- add the appropriate business logic
- and see all the test succeed
(continue only if all tests succeed; do not only check the last one you implemented)
Download the complete solution including all the source code we built so far.
So far we have implemented all required data access and business logic as well as a complete set of unit tests covering all features we have written.
The Sample, Part 4 - A Short Introduction in WatiN
Test Driven Development of UI components is a little bit harder than doing it for data access or business layer. As mentioned before most capture and replay tools do not support this development method. WatiN is a great open source tool for test automation in the area of web applications and it supports Test Driven UI Development!
There is also an open source test recorder for WatiN. It is especially useful when starting with WatiN. We will not cover it in this article.
In short WatiN is a lightweight wrapper around Internet Explorer's object model. It offers you a set of classes with which you can simulate nearly everything you could do with your keyboard and/or mouse in IE yourself. The API is so simple and intuitive that it is even feasible to write tests without first having to capture them using a recording tool.
Because WatiN telecommands IE all active content (e.g. JavaScript, ActiveX, Flash, Silverlight, etc.) is executed during tests. Therefore the tool can also be used to automate test of e.g. JavaScript code. The current version of WatiN just works with IE. As far as I read in various blogs about WatiN Firefox support is on its way.
The beauty of WatiN is its simplicity. You have one central class that you will use most of the time: WatiN.Core.IE. You can either
- create a new instance (opens a new IE window)
new IE( url ) - or attach to an existing IE window
IE.AttachToIE( AttributeConstraint )
The WatiN documentation contains a mapping table in which you can look up the corresponding class for each HTML element.
The WatiN.Core namespace contains a class for nearly every HTML element that could appear on your website. You can retrieve a certain control by using the appropriate method in the IE class. Here are some examples:
- Link myLink = ie.Link( AttributeConstraint );
- Button myButton = ie.Button( AttributeConstraint );
- TextField myTextField = ie.TextField( AttributeConstraint );
You probably noticed the class name AttributeConstraint in the examples above. To create an instance of this class you use the WatiN.Core.Find class. It contains a bunch of static Find.By... methods (e.g. ById, ByName, ByTitle, ByUrl, etc.). They all return an instance of AttributeConstraint that can be used to look up IE windows (e.g.IE.AttachToIE), HTML elements (e.g. ie.TextField), etc.
We will discuss some details like handling JavaScript confirm message boxes, HTML-dialogs, etc. a little bit later. By now you have enough knowledge to start writing tests and code.
The Sample, Part 5 - Test Driven Development of Web UI
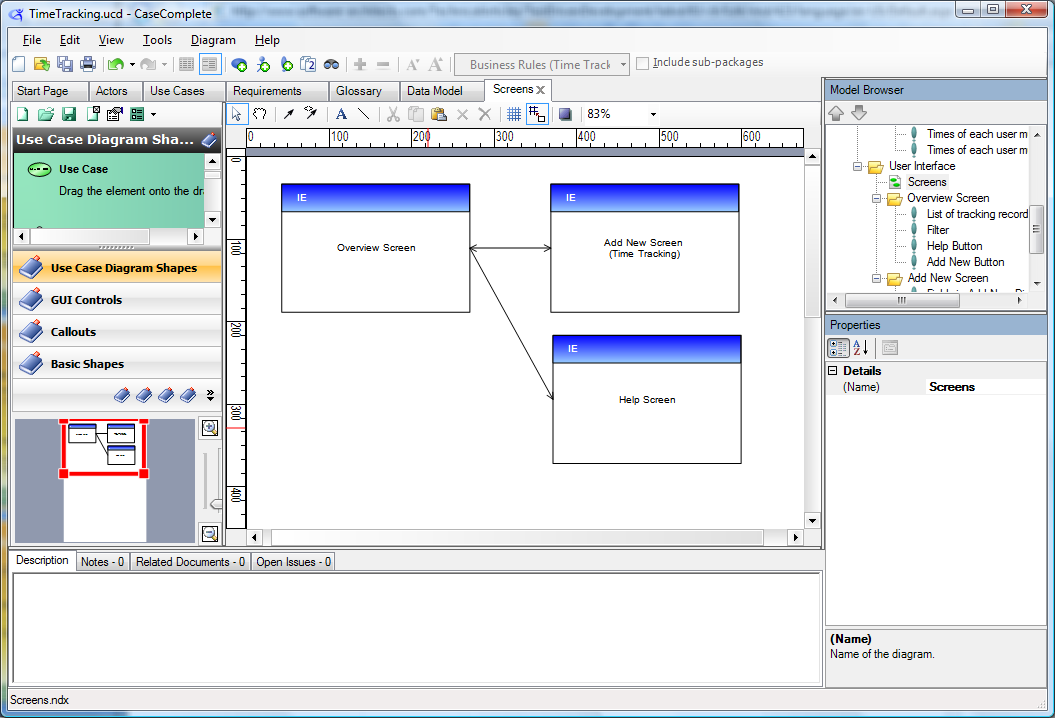
User interface diagram
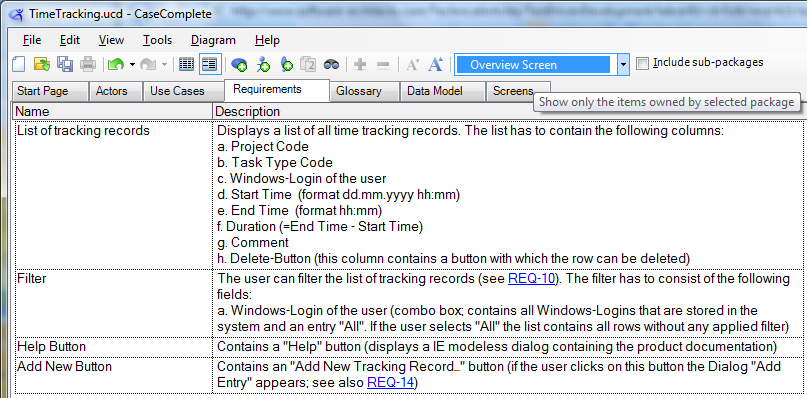
Requirements for Overview screen
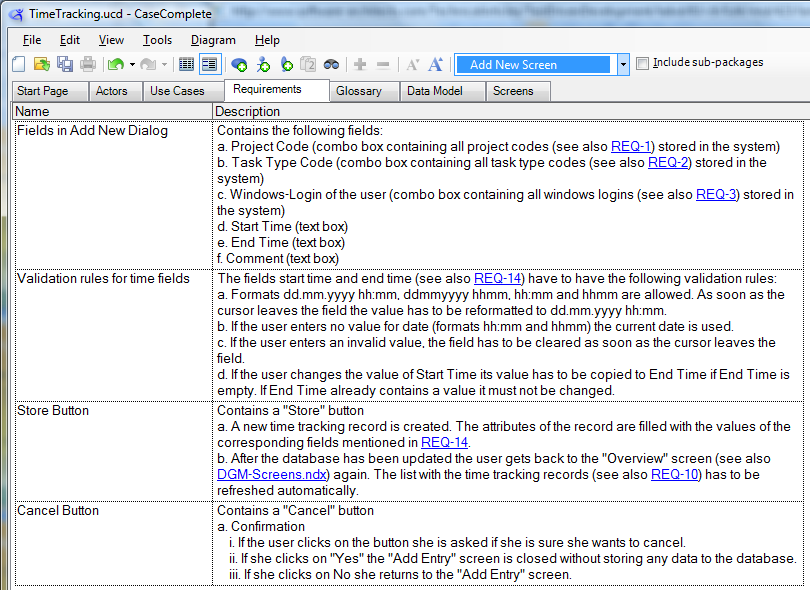
Requirements for AddNew screen
Before we can start developing we have to take a look at the specification again. The analyst specified three screens there:
- One overview screen that displays a list of all TimeTracking entities. The overview screen also has to contain a filter with which you can filter the list to all entities of a certain user.
- The second screen can be used to type in new TimeTracking entities. This screen contains some JavaScript logic that has to be tested, too.
- Last but not least we need to write a help screen (IE modeless dialog).
We recommend that you do not use WatiN directly in your unit test code. You should write a small layer of helper classes to make your test code easier to read, write and maintain. Richard Griffin proposed an interesting Design Pattern for WatiN Tests. Our sample is somewhat similar to his. We recommend that you take a look at Richard's blog.
The following UML class diagram shows the classes we use in our example:
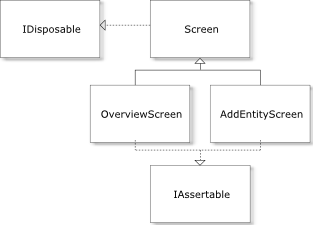
- We create one helper class per IE window. Screen is the common base class for all helper classes.
- The classes encapsulate properties that make it easier to access HTML elements inside the test routines.
- Additionally they implement the interface IAssertable. This interface offers a methodAssertControls. Every class implements this method and checks if the corresponding IE window is consistent (means all necessary controls are present).
With this knowledge we can start writing our first UI unit test. We
- add a new unit test UserInterfaceTests to our test project,
- add references to WatiN.Core.dll and WatiN.Core.UnitTests.dll
- and add a test initialization method that opens a database connection and executes a SQL script filling the database with defined test data (similar to what we did in the initialization methods of the unit tests for the data access layer; this time we also insert some rows into the table TimeTracking).
After these preparation steps we can add the base class Screen and the interfaceIAssertable we mentioned above:
private interface IAssertable
{
    void AssertControls();
}

The constructor of Screen allows the creation of new IE windows as well as attaching to existing ones.

private abstract class Screen : IDisposable
{
    public IE ie { get; private set; }
    public Screen(string url, bool attach)
    {
        ie = attach ? IE.AttachToIE(Find.ByUrl(url)) : new IE(url);
        Assert.IsFalse(ie.Html.Contains("Runtime Error"));
        if (this is IAssertable)
            ((IAssertable)this).AssertControls();
    }

    public Screen(string url)
        : this(url, false)
    {
    }

    public void Dispose()
    {
        ie.Close();
        ie.Dispose();
        GC.SuppressFinalize(this);
    }
}
Based on this helper class we define OverviewScreen. A very basic first version (not complete!) looks like this (you can take a look at the complete implementation in the sample code which you can download below):
Note the property LoginFilter. Properties like this make tests a lot easier to read and write!
If you want to build your tests similar to how we do it, you will have to write a lot of those properties. To make life easier we wrote a short but useful C# snippet for creating such properties.
[Download the snippet].
private class OverviewScreen : Screen, IAssertable
{
    private const string url = "http:// localhost /BugBustersWeb/Default.aspx";
    private const string Control_WindowsLoginFilter = "lstUsers";
    // Constants for all control IDs and other constants that may change often
    // ...

    public OverviewScreen()
        : base(url)
    {
    }

    public SelectList LoginFilter
    {
        get
        {
            var result = ie.SelectList(Control_WindowsLoginFilter);
            Assert.IsTrue(result.Exists);
            return result;
        }
    }

    public void AssertControls()
    {
        var loginFilter = ie.SelectList(Control_WindowsLoginFilter);
        Assert.IsTrue(loginFilter.Exists);
        // check that all other necessary controls are present

        // implementation not complete yet -> throw exception
        throw new NotImplementedException();
    }
}
After adding the complete implementation of OverviewScreen including all helper properties we can go on and write the test method. Note that we have still not written a single line of ASP.NET code. We are doing real TDD here! The test code is quite readable, isn't it?
[TestMethod]
[AspNetDevelopmentServer("localhost", @"C:\Data\...\Applications\BugBusters.Web")]
public void Overview_Launch()
{
    using (var screen = new OverviewScreen(DevServer))
    {
        // Check that login filter contains the correct number of items
        // (number of rows in db plus "All");
        Assert.AreEqual(db.Users.Count() + 1, screen.LoginFilter.AllContents.Count);
        // Check that item "All" is present
        Assert.IsTrue(screen.LoginFilter.AllContents.Contains
          (OverviewScreen.FilterItem_All));

        // Table has to have at least one row (header)
        Assert.IsTrue(screen.ResultGrid.TableRows.Length >= 1);
        // Table has to have 8 columns
        Assert.AreEqual(OverviewScreen.NumberOfResultColumns,
            screen.ResultGrid.TableRows[0].Elements.Cast<Element>().
              Count(elem => elem.TagName == "TH"));
    }
}
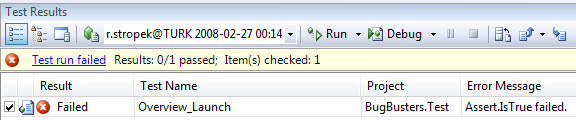
UI unit test failed
Of course the test does not succeed. After all we have not written any ASP.NET code. Now it is time to do that. You can check out the ASP.NET code of the sample in the sample code which you can download below. Here is a screen shot of the Overview screen in Visual Studio:
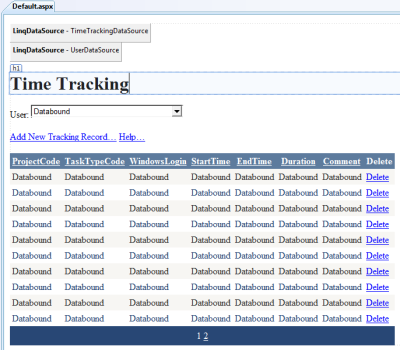
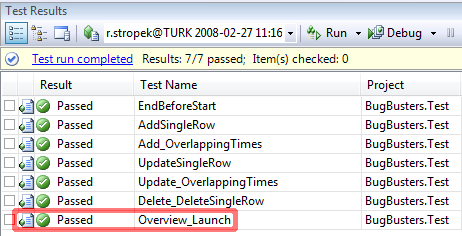
First UI test succeeds
Now that the ASP.NET site really exists the UI unit test succeeds. Do not forget that it is mandatory in TDD to run all tests to really make sure that the last feature you implemented did not screw up other functions of your application.
The specification demands a filter box that can be used to filter the results in the result grid. The box has to contain all users that exist in the database and one extra item "All". If the user selects "All" data of all users has to be displayed. According to the TDD philosophy we develop an UI unit test first.
[TestMethod]
public void Overview_Filter()
{
    using (var screen = new OverviewScreen())
    {
        // iterate over all users in the database plus "All"
        foreach (var user in (new string[] { OverviewScreen.FilterItem_All }).
          Union(from u in db.Users select u.WindowsLogin))
        {
            // select the current user
            screen.SetLoginFilter(user);

            // check that the number of rows in the table corresponds
            // to the number of entries in the database.
            // would not work with paging and a large number of rows!!
            // Just to keep it simple here...
            if (user != OverviewScreen.FilterItem_All)
                Assert.AreEqual(db.Users.Single(
                  uu => uu.WindowsLogin == user).TimeTrackings.Count + 1,
                  screen.ResultGrid.TableRows.Length);
            else
                Assert.AreEqual(db.TimeTrackings.Count() + 1,
                  screen.ResultGrid.TableRows.Length);
        }
    }
}

Filter UI test fails
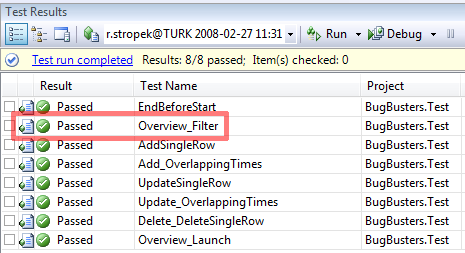
Filter UI test succeeds
Download the complete solution including all the source code we built so far.
Or course it fails because we have not implemented the filter logic yet. The combo box is there but changing it has not effect by now. Only a few minor changes to the ASP.NET files and the filter box works (you can take a look at the ASP.NET code by downloading the sources below).
The Sample, Part 6 - WatiN Special Topics
With the procedure we showed before we can implement our solution step by step.
- We understand the corresponding part of the specification.
- We write a unit test.
- We try the test; it should fail (if not you can stop here because no code is necessary)
- We implement the necessary logic.
- We try all the tests; they have to work.
- If necessary and appropriate we refactor what we have built. If you decide to refactor your code make sure that after you have finished all the tests still work.
It would be boring for us to write and for you to read if we would show you every single step to the complete solution here. Every step follows the same procedure you see above. At the very end of this article you can find the download link to the completely implemented solution including all the source code.
However, there are some special WatiN topics in the other parts of the unit test code that are worth while discussing them in detail.
HANDLING IE MODELESS DIALOGS
In IE you can open modeless dialogs (WatiN calls them HTML Dialogs) by usingwindow.showModelessDialog(...) instead of window.open(...). Such windows require special handling in WatiN. If you want to access them you cannot use the WatiN.Core.IEclass. You have to use WatiN.Core.HtmlDialog instead. As discussed above we do not directly use WatiN classes in our test code. We created the base class Screen and descendant classes as a helper layer between the test code and WatiN. However, Screen usesWatiN.Core.IE internally and cannot be used for HTML dialogs though. We have to build another helper class for that case: Dialog.
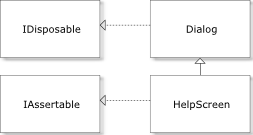
The UML diagram above shows the class Dialog as well as the descendant class HelpScreen.Dialog is extremely similar to Screen:
Note that Dialog uses WatiN's classHtmlDialog instead of IE.
private abstract class Dialog : IDisposable
{
    protected HtmlDialog dialog { get; private set; }

    public Dialog(Screen parentScreen, string url)
    {
        dialog = parentScreen.ie.HtmlDialog(Find.ByUrl(url), 2);
        if (this is IAssertable)
            ((IAssertable)this).AssertControls();
    }

    public void Dispose()
    {
        dialog.Close();
        GC.SuppressFinalize(this);
    }
}
Here is the unit test code that tests if the "Help" link works:
Note that we use ClickNoWait instead ofClick here. Click internally callsWaitForComplete which waits for Internet Explorer telling it has finished handling the request. However, Click would wait endlessly because a new window opened.ClickNoWait does not wait and is the function of choice in this case!
[TestMethod()]
public void Overview_Help()
{
    using (var screen = new OverviewScreen())
    {
        screen.HelpLink.ClickNoWait();
        using (var help = new HelpScreen(screen)) { };
    }
}
Dialog windows that are opened using window.open can be handled with descendants of the normal Screen class:
[TestMethod]
public void AddEntry_Launch()
{
    using (var overviewScreen = new OverviewScreen())
    {
        overviewScreen.AddNewLink.ClickNoWait();
        using (var screen = new AddEntryScreen())
        {
            // Check that combo boxes contain the correct number of items
            Assert.AreEqual(db.Projects.Count(),
              screen.ProjectCode.AllContents.Count);
            Assert.AreEqual(db.TaskTypes.Count(), screen.TaskType.AllContents.Count);
            Assert.AreEqual(db.Users.Count(), screen.Users.AllContents.Count);
        }
    }
}
Handling Javascript Confirm Boxes
Another interesting topic is how to handle JavaScript Confim Boxes. In our case the "Add New" screen opens a confirm box if the users clicks on the "Cancel" button. WatiN offers two classes for dealing with confirm boxes:
- ConfirmDialogHandler
- UseDialogOnce
In our sample you can see how to use them in the AddEntry_CancelYes method:
[TestMethod]
public void AddEntry_CancelYes()
{
    using (var overviewScreen = new OverviewScreen())
    {
        // remember number of records before delete
        // (just to keep it simple; not a good idea if tests
        // are running simulateously)
        var numberOfTimeTrackingRecords = db.TimeTrackings.Count();

        overviewScreen.AddNewLink.ClickNoWait();
        using (var screen = new AddEntryScreen())
        {
            // fill in test data
            screen.EnterTestData();
In this first case we simulate a click on "Cancel" in the confirmation box. The user has to stay on the "Add new" screen in this case.
            // click cancel and then NO -> must return to dialog
            var confirm = new ConfirmDialogHandler();
            using (new UseDialogOnce(screen.ie.DialogWatcher, confirm))
            {
                screen.CancelLink.ClickNoWait();
                confirm.WaitUntilExists();
                confirm.CancelButton.Click();
                screen.ie.WaitForComplete();
            }
In the second case we simulate a click on "OK" in the confirmation box. The user has to return to the "Overview" screen.
            // click cancel and then YES -> must return to "Overview" screen
            using (new UseDialogOnce(screen.ie.DialogWatcher, confirm))
            {
                screen.CancelLink.ClickNoWait();
                confirm.WaitUntilExists();
                confirm.OKButton.Click();
                overviewScreen.ie.WaitForComplete();

                // make sure nothing changed after cancel
                Assert.AreEqual(numberOfTimeTrackingRecords,
                  db.TimeTrackings.Count());
                Assert.AreEqual(numberOfTimeTrackingRecords,
                  overviewScreen.ResultGrid.TableRows.Length - 1);
            }
        }
    }
}
Summary
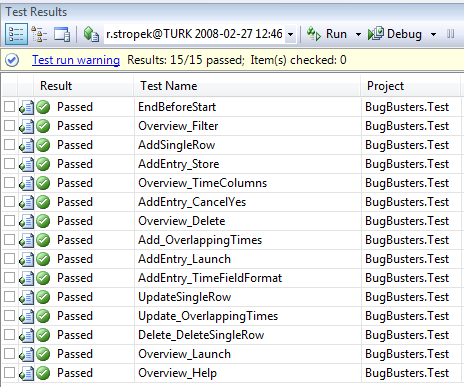
Now our application is finished. All the tests succeed!
Download the complete solution including all the source code for this sample.
If you want to play with the sample yourself feel free to download the code (see link on the right side). We would love to hear your comments and suggestions. Send them to us at rainer@timecockpit.com, karin@timecockpit.com or support@timecockpit.com.
Content

Tags
.NET (40) ADC (1) Android (1) Angular (4) AngularJS (3) ASP.NET (7) ASPNET Core (1) ASPNET (1) Assembler (1) Azure (62) BASTA (2) Blazor (2) C# (35) C (1) CLI (2) Cloud (1) CoderDojo (1) Conferences and Workshops (2) Container (4) CPP (3) CSharp (5) DevOps (2) Docker (12) Documentation (1) DotNet (1) ECMAScript (1) GAB (1) HTML (2) HTML5 (2) Iron Python (1) JavaScript (3) JWT (1) Markdown (1) MEF (3) Microservices (3) Microsoft (2) Minecraft (2) Mobile (2) Node (1) Node.js (2) NPM (1) OData (5) Presentations (4) Project Management (2) Registry (1) Roslyn (2) Silverlight (3) Software Quality Days (1) SPA (1) SQL (3) SQLCE (1) SVG (1) TechDays (1) Techorama (1) Testing (1) TFS (9) time cockpit (4) TypeScript (18) Visual Studio (37) VSCode (1) VSTS (2) WebAssembly (2) Windows (1) WPF (9) Yarn (1)Authors
Related Posts

TechDays Sweden 2017 - Dockerizing .NET Apps
26 October 2017 - .NET, Docker, Microservices, TechDays
Yesterday, I did a session about Dockerizing .NET applications at TechDays Sweden. In this blog post, I share a recording of my talk and the slides that I used.

BASTA 2017 - Recordings and Session Material
27 September 2017 - BASTA, .NET, Docker, Microservices, Visual Studio, Yarn, NPM
September is BASTA! time. It has become a beloved tradition for me to travel in Autumn to Mainz to speak at the BASTA! conference. This year, my workshop, session and keynote topics were .NET, microservices and web dev technology. In this blog post I share my session material and recordings.