Automated deploying and testing of services in Azure
14 February 2011 - Azure
We have been experimenting with automated testing of our services against windows azure lately. Our goal was to deploy a service in the build process, run a unit test, and then undeploy the process. Assuming that you have a hosted service ready (something.cloudapp.net) and a solution with a unit test running locally against a service (running locally, when executing the unit test, there are a few steps one needs to take in order to test against an azure-deployed instance of this:
- Enable the build machine to deploy to your subscription
- Build the cspkg file during the build process
- Deploy to azure using the windows azure cmdlets
- Run the unit test against the newly deployed service
- Remove the deployed service after running the unit test
Enabling the build machine to deploy to Azure
Windows Azure provides a web service for managing your subscription programatically. It allows you to create roles, change instance counts, create storages and queues, and so on. Since sending passwords back and forth is not a really safe idea, the service using client certificiates. This basically means, that you create a certficiate on the client machine and upload the public key of the certificate to azure. This way you tell your azure subscription to trust content from the machine where you created the certificate. So, to let the build machine do this, login to the build machine with the user that runs the tfs build agent. Open up a cmd.exe, navigate to a directory where you feel comfortable creating a certificate ( a new folder e.g.) and execute the following command (I found this here):
makecert -r -pe -a sha1 -n "CN=Windows Azure Authentication Certificate"
         -ss My -len 2048
         -sp "Microsoft Enhanced RSA and AES Cryptographic Provider"
         -sy 24 testcert.cer
This creates a testcert.cer file containing the public key of a newly created certificate. Remember that this file is nothing critical. It only contains the public key of the certificate. The private key is locked up in the key store of the machine. You can upload this key to the windows azure management portal to allow the machine to manage the subscription (using the recently created certificate). The private key is also not exportable from the keystore. This implies that you have to create a new certificate for every machine you want to deploy from. All of this mechanisms is nothing new and quite commonplace in other secure applications. SSH with password-less login does exactly the same thing. Credit to Microsoft for doing things this way (and making it the only way to do it!). It really helps preventing to have passwords that are checked into source trees. Now that we can deploy to the azure from the build machine, we can go use the azure command lets. But, uhm, we need something to deploy first, so let's enable packaging of the service in the build process.
Building the cspkg in the build process
This one is actually quite easy: A Cloud project, as created with the Azure SDK and VS 2010, is basically a MSBuild script based upon the Azure MSBuild template / tasks file. It therefore comes with a Publish task that creates a Publish folder in the output directory and packages the cspkg / cscfg file to that directory. All we have to do is to make sure that the target is called. Open up the build definition, navigate to Process and within the Advanced settings, set the MSBuild Arguments property to "/t:Build;Publish".
.png)
This tells MSBuild to execute the Build and the Publish target. When you execute the build with those arguments, a Publish folder will be copied to the Drop location containing the cspkg and csconfig file. It is also available after the Solution has compiled and means we can access it during the build process. Now that we have our config and the package, let's get to the real meat and deploy the service in the build process.
Deploying to Azure using Windows Azure Cmdlets
Now, Windows Azure having a REST service API is all great, we can access it using any language that can do a web request. But honestly, the working solely with the REST API can be quite cumbersome: In order to deploy a service you have to upload a package to blob storage and the do a deploy from there. Windows Azure cmdlets are extensions to the powershell that make life a lot easier. First, install them on the build machine. You can find them here. Of course it requires powershell, but I think you could have guessed that (You can find PowerShell 2.0 here). Installing the azure cmdlets is quite straight forward, so I won't describe it here.
The windows azure cmdlets allows you to write commands like this:
Get-HostedService "MyService" -Certificate $cert -SubscriptionId $sub |
    Get-Deployment -Slot 'Staging' |
    Set-DeploymentStatus 'Running' |
    Get-OperationStatus -WaitToComplete
This gets the service "MyService" using the certificate $cert and the subscription $sub. How do we fill those variables? The certificate can be found by its thumbprint:
$cert = Get-Item cert:\CurrentUser\My\$certTPwhere $certTP is the thumbprint of the certificate, as presented by the Azure management portal. $sub is just the subscription id, a Guid, also 1:1 the way it is presented in the Azure Managment portal. The first command returns a hosted service object, that is piped to the Get-Deployment command, which returns the a Deployment that is in turn piped to the Set-DeploymentStatus cmdlet. The Set-DeploymentStatus returns an asynchronous operation object which is piped to the Get-OperationStatus cmdlet. The -WaitToComplete flag makes sure that the command waits until the asynchronous operation has finished. This does not mean that the service is available after the operation status has completed (unfortunately), so have we have to poll until the role status is ready. All together we need a script that deploys a package to staging swaps it to productive and removes the (old) staging environment. I think it is pretty self-explanatory, so I won't comment too much:
# certificatethumb subscriptionId servicename package config
$certTP = $args[0]
$cert = Get-Item cert:\CurrentUser\My\$certTP
$sub = $args[1]
$storageAccount = $args[2]
$servicename = $args[3]
$package = $args[4]
$config = $args[5]
$label = $args[6]
Add-PSSnapin AzureManagementToolsSnapIn
New-Deployment -serviceName $servicename -storageserviceName $storageAccount
-subscriptionId $sub -certificate $cert -slot 'Staging'
-package $package -configuration $config -label $label |
Get-OperationStatus -WaitToComplete
Get-HostedService $servicename -Certificate $cert -SubscriptionId $sub |
Get-Deployment -Slot 'Staging' |
Set-DeploymentStatus 'Running' |
Get-OperationStatus -WaitToComplete
Get-Deployment staging -subscriptionId $sub -certificate $cert -serviceName $servicename |
Move-Deployment |
Get-OperationStatus -WaitToComplete
Get-HostedService $servicename -Certificate $cert -SubscriptionId $sub |
Get-Deployment -Slot 'Staging' |
Set-DeploymentStatus 'Suspended' |
Get-OperationStatus -WaitToComplete
Get-HostedService $servicename -Certificate $cert -SubscriptionId $sub |
Get-Deployment -Slot 'Staging' |
Remove-Deployment |
Get-OperationStatus -WaitToComplete
Get-HostedService $servicename -Certificate $cert -SubscriptionId $sub |
Get-Deployment -Slot 'Production' |
Set-DeploymentStatus 'Running' |
Get-OperationStatus -WaitToComplete
$ready = $False
while(!$ready)
{
$d = Get-HostedService $servicename -Certificate $cert -SubscriptionId $sub |
Get-Deployment -Slot 'Production'
$ready = ($d.RoleInstanceList[0].InstanceStatus -eq "Ready") -and ($d.Label -eq $label)
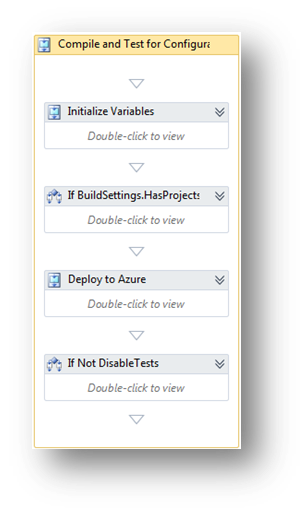
}So, now that we have a script, that does our deployment. Let's plug it into the build process! TFS Build 2010 (or TFS 2010 Build ?) is based upon WorkFlow 4.0. So we get a nice UI for editing our build process. The place where we want to deploy our package is right between building and testing. So navigate to Sequence -> Run On Agent -> Try Compile, Test and Associate Changesets and Work Items -> Sequence -> Compile, Test, and Associate Changesets and Work Items -> Try Compile and Test -> Compile and Test -> For each configuration in BuildSettings.PlatformConfigurations -> Compile and Test for Configuration. Compile and Test for Configuraiton looks something like this:
As you can see, I added a Sequence called "Deploy to Azure" in there, it looks like this
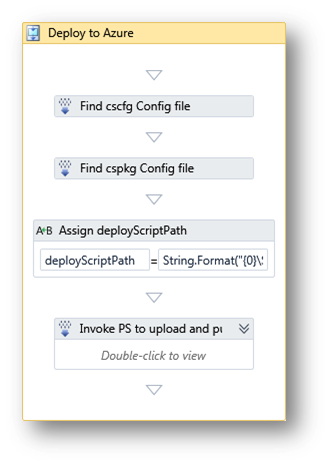 First it runs to FindMatchingFiles tasks for the config and the cspkg file. The arguments to the FindMatchingFiles activity is "String.Format("{0}\Publish\*.cscfg", BinariesDirectory)" and "String.Format("{0}\Publish\*.cspkg", BinariesDirectory)" respectively. This prevents us from having to pass arguments to the build process and therefore hard"coding" the name of the service. Note that currently we only deploy the first package found. It also builds a path to the powershell script to deploy. The Invoke PS to upload and publish activity is the part where the magic happens: It invokes the powershell script and passes the arguments. The Arguments property is a bit more complex, so I'll post it here:
String.Format("-File ""{0}"" {1}",
  deployScriptPath,
  String.Format("""{0}"" ""{1}"" ""{2}"" ""{3}"" ""{4}"" ""{5}"" ""{6}""",
    AzureCertificateThumbprint,
    AzureSubscriptionID,
    AzureStorageName,
    AzureHostedServiceName,
    packagePath.Single(),
    configPath.Single(),
    LabelName))
AzureCertificateThumprint, AzureSubscriptionID, AzureStorageName and AzureHostedServiceName are arguments to the build process, so that we can pass them to the build process in the build definition. packagePath and configPath are the enumerations returned by the FindMatchingFiles Activities and LabelName is a variable from the default template containing the name of the build. This way we get our version/build number into the deployment name.
Running the unit test against the newly deployed service
This one is quite easy again: All we have to do is change the endpoint in the configuration file for the unit test that we are executing. Point it to the URL where the hosted service is running and run the build again. This currently is a bit weak, as we have to change the configuration if we want to execute the unit tests locally. I'm still investigating on what would be the best way to make the end point configurable, but argument-passing is definitely not the strength of MSTest.
Anyhow, once you start a new build, the service should be deployed to the azure and the unit test should pass just fine. When you open up the build log, you will see a task that took about 11 minutes to execute:

Yes, it takes azure quite a while to get a service up and running, but hey it's firing up a new machine for the role you are deploying, so not too bad after all.
Remove the deployed service after running the unit test
Since we don't want to hog up resources in Azure and safe some money, we want to make sure, that we delete the role, once the service has passed. All we need to do this, is add another Invoke Process to execute a second powershell script that undeploys from Azure. The script looks like this:
# certificatethumb subscriptionId servicename
$certTP = $args[0]
$cert = Get-Item cert:\CurrentUser\My\$certTP
$sub = $args[1]
$servicename = $args[2]
Add-PSSnapin AzureManagementToolsSnapIn
Get-HostedService $servicename -Certificate $cert -SubscriptionId $sub |
Get-Deployment -Slot 'Production' |
Set-DeploymentStatus 'Suspended' |
Get-OperationStatus -WaitToComplete
Remove-Deployment -Slot 'Production' -ServiceName $servicename -SubscriptionId $sub -Certificate $cert |
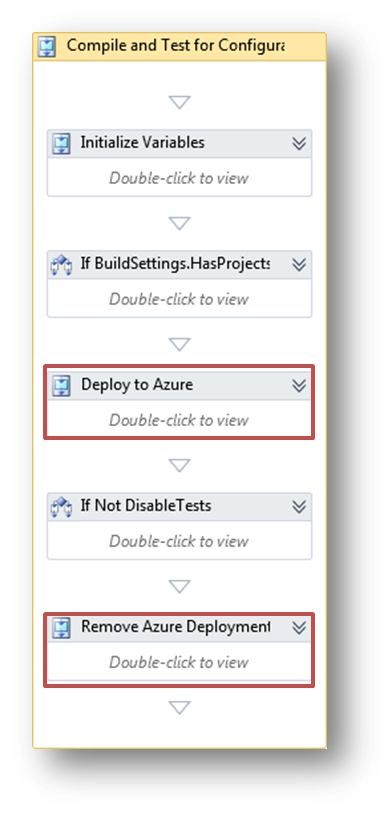
Get-OperationStatus -WaitToCompleteYou'll have to plug it right after the "If Not Disable Tasks" in the build process:
I think you can figure out the required arguments yourself. Just make sure you don't by mistake take down your productive service. I recommend using different subscriptions or so :) As you can see, Windows Azure Cmdlets really make things a lot easier. It would be nice to have Workflow activities to manage Azure instances, but quite frankly, with the current (perceived) speed of the Workflow editor I'd rather type a powershell script and only do the boilerplate things in Activities.
Content