Windows Azure Websites + TypeScript + node.js = JavaScript on Steroids
20 February 2013 - Azure, TypeScript
Abstract
JavaScript has an important advantages: Reach. However, the language is not perfectly suited for larger development projects. The new language TypeScript offers a solution. It combines the advantages of type information for compile-time error checking and IntelliSense with the reach of JavaScript. In this session, Azure MVP Rainer Stropek demonstrates how you can make use of TypeScript to implement a web application with a node.js. See how you can share business logic code between server and client, and watch how to deploy your TypeScript application to Windows Azure Websites.
Using My Sample as a Hands-On Lab
If you want to get my sample running, you can copy-and-paste the code I show below on your machine. In order to be able to build and run it, you will need the following components:
- Visual Studio 2012 (you can get the sample running without VS2012; however, it is a lot more fun if you have it)
- TypeScript with Visual Studio 2012 tooling (get it from http://www.typescriptlang.org)
- Node.js (get it from http://nodejs.org)
- git (get it from http://git-scm.com)
For the source code you should create the following directory structure:
-
Sample root
- code
- DefinitelyTyped
TypeScript Basics
TypeScript is a great new language that has the potential to enable efficient use of JavaScript in larger projects. In the past I did quite a few talks and wrote articles on TypeScript. At the beginning of my talk I presented some of the most important language features like modules, interfaces, classes, etc. If these basics are new to you, I encourage you to talk a look at my TypeScript intro slide deck.
During my talk at the MVP Summit 2013 I talked about some of the basics using a simple example module implementing a Customer class. It was the starting point for my sample. Here is the code:
export module customer {
    /**
      * Represents a customer
      * @param firstName First name of customer
      * @param lastName Last name of customer
      */
    export interface ICustomer {
        firstName: string;
        lastName: string;
    }

    /**
      * Represents a customer
      */
    export class Customer implements ICustomer {
        public firstName: string;
        public lastName: string;

        constructor (arg: ICustomer = { firstName: "", lastName: "" }) {
            this.firstName = arg.firstName;
            this.lastName = arg.lastName;
        }

        /**
          * Returns the full name of the customer
          */
        public fullName() {
            return this.lastName + ", " + this.firstName;
        }
    }
}
Note that the sample class uses a rather new feature of the TypeScript tooling: JSDoc support.
If you want to play with my sample, copy the code of the class in the code directory. Compile it using the TypeScript compiler: tsc Customer.ts. Now take a few minutes to take a look at the resulting Customer.js file. I encourage you to open the file in Visual Studio 2012 and play with IntelliSense, syntax checking, syntax highlighting, etc.
Programming Node.js With TypeScript
The first practical use of TypeScript that I showed at MVP Summit was using the basic TypeScript module shown above on the server-side with node.js. Let's assume we want to implement a very simple REST/JSON-based Web API to query customers. Users of our API should able to query a single customer using a URI like http://<myserver>/Customer/99 (asking for customer with ID 99). If the user needs all users, she would use a URI like http://<myserver>/Customer. Here is the code that I have developed during my session (copy it into the file server.js in the code directory):
/// <reference path="../DefinitelyTyped/node/node.d.ts" />
/// <reference path="../DefinitelyTyped/express/express.d.ts" />
/// <reference path="./customer.ts" />
import express = module("express");
import crm = module("customer");

var app = express();

app.get("/customer/:id", function (req, resp) {
    var customerId = <number>req.params.id;
    var c = new crm.customer.Customer({ firstName: "Max" + customerId.toString(), lastName: "Muster" });
    console.log(c.fullName());
    resp.send(JSON.stringify(c));
});

app.get("/customer", function (req, resp) {
    var customers: crm.customer.Customer [];
    customers = new Array();
    for (var i = 0; i<10; i++) {
        customers.push(new crm.customer.Customer({ firstName: "Max" + i.toString(), lastName: "Muster" }));
    }
    resp.send(JSON.stringify(customers));
});

var port = process.env.PORT || 1337;
app.listen(port);
Before I draw you attention to some details of the code, note that my samples uses the express.js framework for implementing the Web API. In order to get it, you need a reference to the module in your package.json file. Here is the code (copy it into the code directory):
{
  "name": "hello-world",
  "description": "hello world test app",
  "version": "0.0.1",
  "private": true,
  "dependencies": {
    "express": "3.1.0"
  }
}
After you have copied the package.json file to the directory, you have to run npm install in the directory. It will inspect the package.json file and get the referenced modules from the web. It will place it in the node_modules subdirectory.
Now let's get back to the code in server.js. You might have noticed the references to node.d.ts, express.d.ts, and customer.ts at the beginning of the file. These references are key to your understanding of the advantages of TypeScript. Types enable the development environment to give you e.g. IntelliSense. We do not only want IntelliSense for our own Customer class, we want it for existing packages like the node.js SDK and express.js, too. However, they are implemented in JavaScript without type information. So where can we get the type information for them? The answer is the DefinitelyTyped project on github. It brings type information for all major JavaScript libraries. In order to get it, you do not need to download it manually. Use git instead. Here is how you do that:
- Open a command prompt
- Change directory to DefinitelyTyped
- Initialize a git repository in this directory: git init
- Pull down DefinitelyTyped from github: git pull https://github.com/borisyankov/DefinitelyTyped.git
After you have downloaded the type information, you should reload server.js in Visual Studio. Now you have IntelliSense for the node.js SDK and even for require.js. Isn't that cool? You are ready to compile server.ts: tsc server.ts. Take a few minutes to look at the resulting JavaScript file server.js.
After you successfully compiled both TypeScript files, you are ready to test your Web API locally. You run the server using node: node server.js. If it started without an error, you can try it in the browser or in Fiddler: http://localhost:1337/customer/99. You should see the JSON result from your Web API call.
Running Your Web API in Windows Azure using Windows Azure Websites
If your Web API runs locally, deploying it in Windows Azure is a piece of cake. Here is how you do it:
- If you do not already have a Windows Azure subscription, get one at http://www.windowsazure.com. It is free.
- Log in to your Windows Azure Management Portal at http://windows.azure.com.
- Create a new and empty Windows Azure Website (WAWS) in the Management Portal:
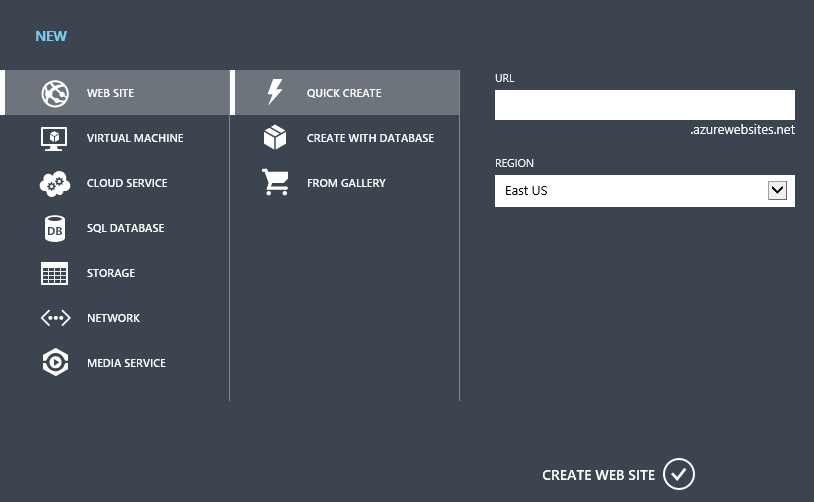 (Image source: http://www.windowsazure.com; click to enlarge)
 - Once the website will have been created (only takes a few seconds), you have to enable git-deployment:
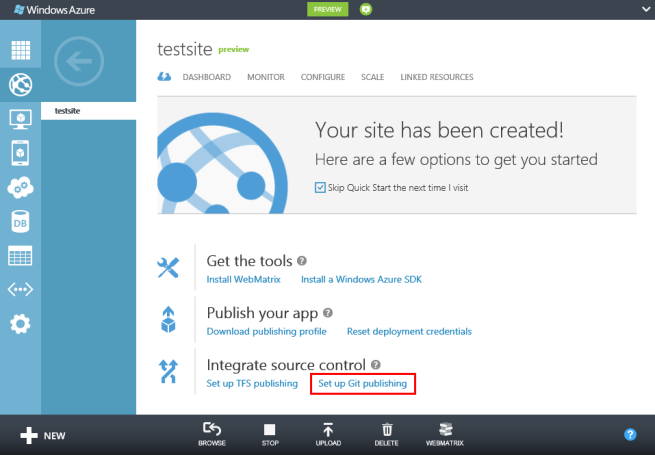 (Image source: http://www.windowsazure.com; click to enlarge)
- Once git deployment will have been enabled (again only takes a few seconds), you should copy the git repository URI. We will need it later.
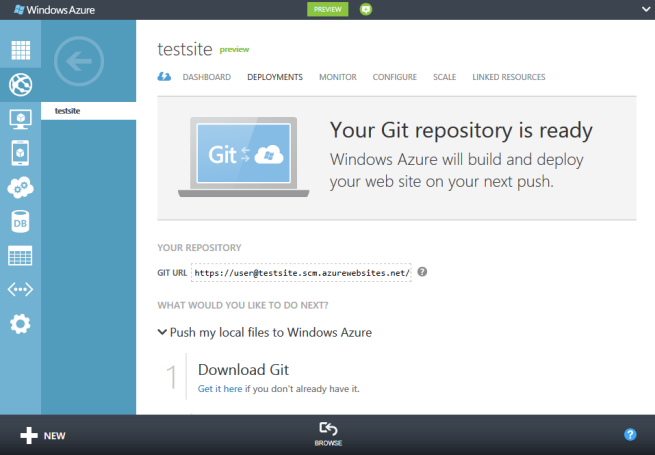 (Image source: http://www.windowsazure.com; click to enlarge)
 - Now let's setup a local git repository which we can later push into the cloud. If you want to learn more about the basics of git, I suggest taking a look at git's manual pages. If you want to get help about e.g. the git commit command, you can launch the corresponding manual page by typing git help commit on the command line. If you are new to git, here are the steps necessary to prepare your local repository:
- Open a command prompt
- Navigate to your code directory
- Initialize the local git repository: git init
- Add the necessary files (only the JavaScript files, the TypeScript sources are not necessary at runtime): git add customer.js server.js package.json
- Commit your changes: git commit -m "Initial deployment"
- Next we add the git repository in the cloud as a remote repository to our local repository (note that azure is the name of the remote repository; choose a different name if you want): git remote add azure <path_to_git_repo_copied_from_azure_management_portal>
- Last but not least we push our local files into our Windows Azure Website: git push azure master
Watch closely how git deploys your Web API into the cloud. Notice that we did not add the express.js package to git. It is just referenced in package.json. Deployment to WAWS pays attention to this reference and gets the referenced package during deployment.
That's it. Your Web API is online. You can try it using http://<yourwebsite>.azurewebsites.net/customer/99.
Sharing TypeScript Code Between Client and Server
Now we have a Web API in the cloud, we need a client consuming it. We are going to implement a very simple client that uses JQuery to load customer data and display it on a website. In this scenario, TypeScript gives us a lot of advantages over writing the client using pure JavaScript:
- IntelliSense and type-safety (to a certain extent) for client-side libraries like JQuery.
- IntelliSense and type-safety for our Customer module because we are going to share the TypeScript code on server and client.
- Re-use the business logic in our Customer class (fullName method) on the client. This is useful in practice for e.g. form validation logic, calculated properties, etc.
In order to use our Customer TypeScript module, we have to use Asynchronous Module Definition (AMD). We are going to use the Require.JS framework to load AMD modules. I will not go into the details of AMD and require.js. If you are interested follow the links. They will bring you the more detailed information on the topic including samples.
In order to safe time I suggest that you download the pre-built client and open it in Visual Studio 2012: Download Source Code. I will walk you through the interesting parts of the project in a second. You should extract the ZIP file with the source code directly in your code directory so that it contains a subdirectory called website and a helper-file called .gitignore.
Before you open the downloaded solution in Visual Studio, you should open the file SharedSource.csproj in a text editor like Notepad++. I would like to draw your attention to the PropertyGroup elements for Debug and Release configurations:
  <PropertyGroup Condition="'$(Configuration)' == 'Debug'">
    <TypeScriptTarget>ES3</TypeScriptTarget>
    <TypeScriptIncludeComments>true</TypeScriptIncludeComments>
    <TypeScriptSourceMap>true</TypeScriptSourceMap>
    <TypeScriptModuleKind>AMD</TypeScriptModuleKind>
  </PropertyGroup>
Note the line <TypeScriptModuleKind>AMD</TypeScriptModuleKind>. This forces Visual Studio to use the --module AMD switch when compiling TypeScript files. Let's take a look at the consequences of this compiler switch. Here is the JavaScript code generated from Customer.ts without the AMD switch:
(function (customer) {
    var Customer = (function () {
        function Customer(arg) {
            if (typeof arg === "undefined") { arg = {
                firstName: "",
                lastName: ""
            }; }
            this.firstName = arg.firstName;
            this.lastName = arg.lastName;
        }
        Customer.prototype.fullName = function () {
            return this.lastName + ", " + this.firstName;
        };
        return Customer;
    })();
    customer.Customer = Customer;
})(exports.customer || (exports.customer = {}));
var customer = exports.customer;
Now let's compare that with the JavaScript code when compiled with tsc --module AMD customer.ts:
define(["require", "exports"], function(require, exports) {
    (function (customer) {
        var Customer = (function () {
            function Customer(arg) {
                if (typeof arg === "undefined") { arg = {
                    firstName: "",
                    lastName: ""
                }; }
                this.firstName = arg.firstName;
                this.lastName = arg.lastName;
            }
            Customer.prototype.fullName = function () {
                return this.lastName + ", " + this.firstName;
            };
            return Customer;
        })();
        customer.Customer = Customer;
    })(exports.customer || (exports.customer = {}));
    var customer = exports.customer;
})
As you can see the AMD version will work perfectly fine with require.js.
Now that you have seen what happens behind the scenes, we can concentrate on the actual source code. Open the downloaded solution in Visual Studio. I suggest that you open the file app/AppMain.ts. It contains the JQuery code accessing the Web API we have created previously. Play around with the code. You will see IntelliSense and type safety for our customer class and JQuery. We have reached one of our main goals: We share code (Customer class) between server and client.
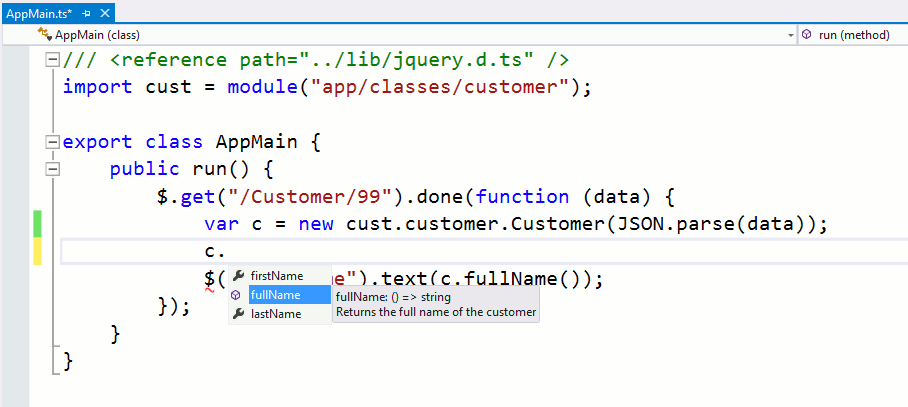 (click to enlarge)
Of course we now want to test our application. To do this we add a single line to our server.ts file:
...

app.use("/", express.static(__dirname + "/website/"));

var port = process.env.PORT || 1337;
app.listen(port);
The important line is the one with app.use(...); It enables access to the static files in the website directory. When you have added the line, don't forget to compile everything (server.ts and the solution in Visual Studio). After that you are ready to test it locally. Run node server.js and open the static website in your favorite browser:
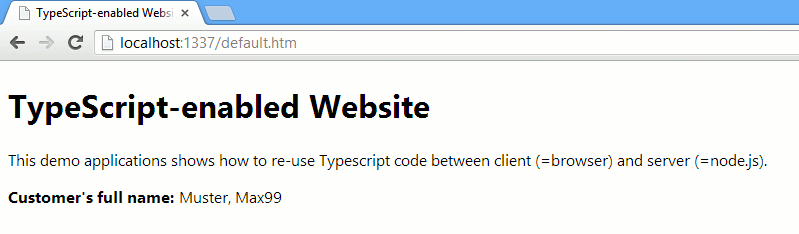 (click to enlarge)
Pushing the Changes into the Cloud
Last but not least we will push the changes including the website using the Web API into the cloud. Here is how you do that:
- Open a command prompt and navigate to your code directory.
- Add the static website files to your git repository: git add website
- Commit your changes: git commit -m "Extended version"
- Push changes into the cloud: git push azure master
Done! Try your website in the cloud:
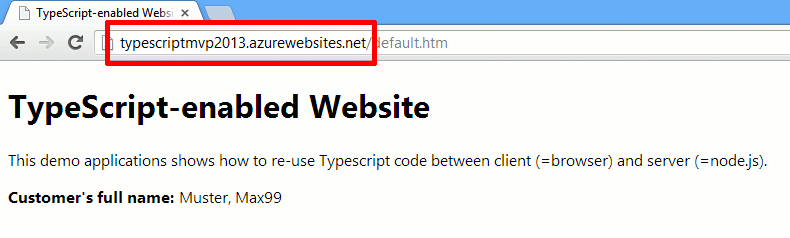 (click to enlarge)
Content