What's New For Devs in Win8.1
04 November 2013 - Azure, Mobile, Visual Studio
One of our partners, IT-Visions, invited me to speak at their VS2013/Win8.1 What's New event in Munich today. Of course I was happy to participate. During the session I demo new features from VS2013, Windows Store app development, and - of course - Windows Azure Mobile Services. The session was nearly 100% live coding. I just used the slides at the end to speak about those topics I could not cover. In this blog article you find the entire slide deck as well as the sample solution I (partly) developed during my talk.
Slides
Sample Code
Note that the sample is just demonstrating features. It is not fully functional and definitely not production-ready code!
Download the sample code (Visual Studio 2013 project including a Mobile Service custom API written in JavaScript).
Do you like the images? You find more in my Flickr album and my private blog about keeping honey bees (German).
Session Recording (German)
Sample Walkthrough
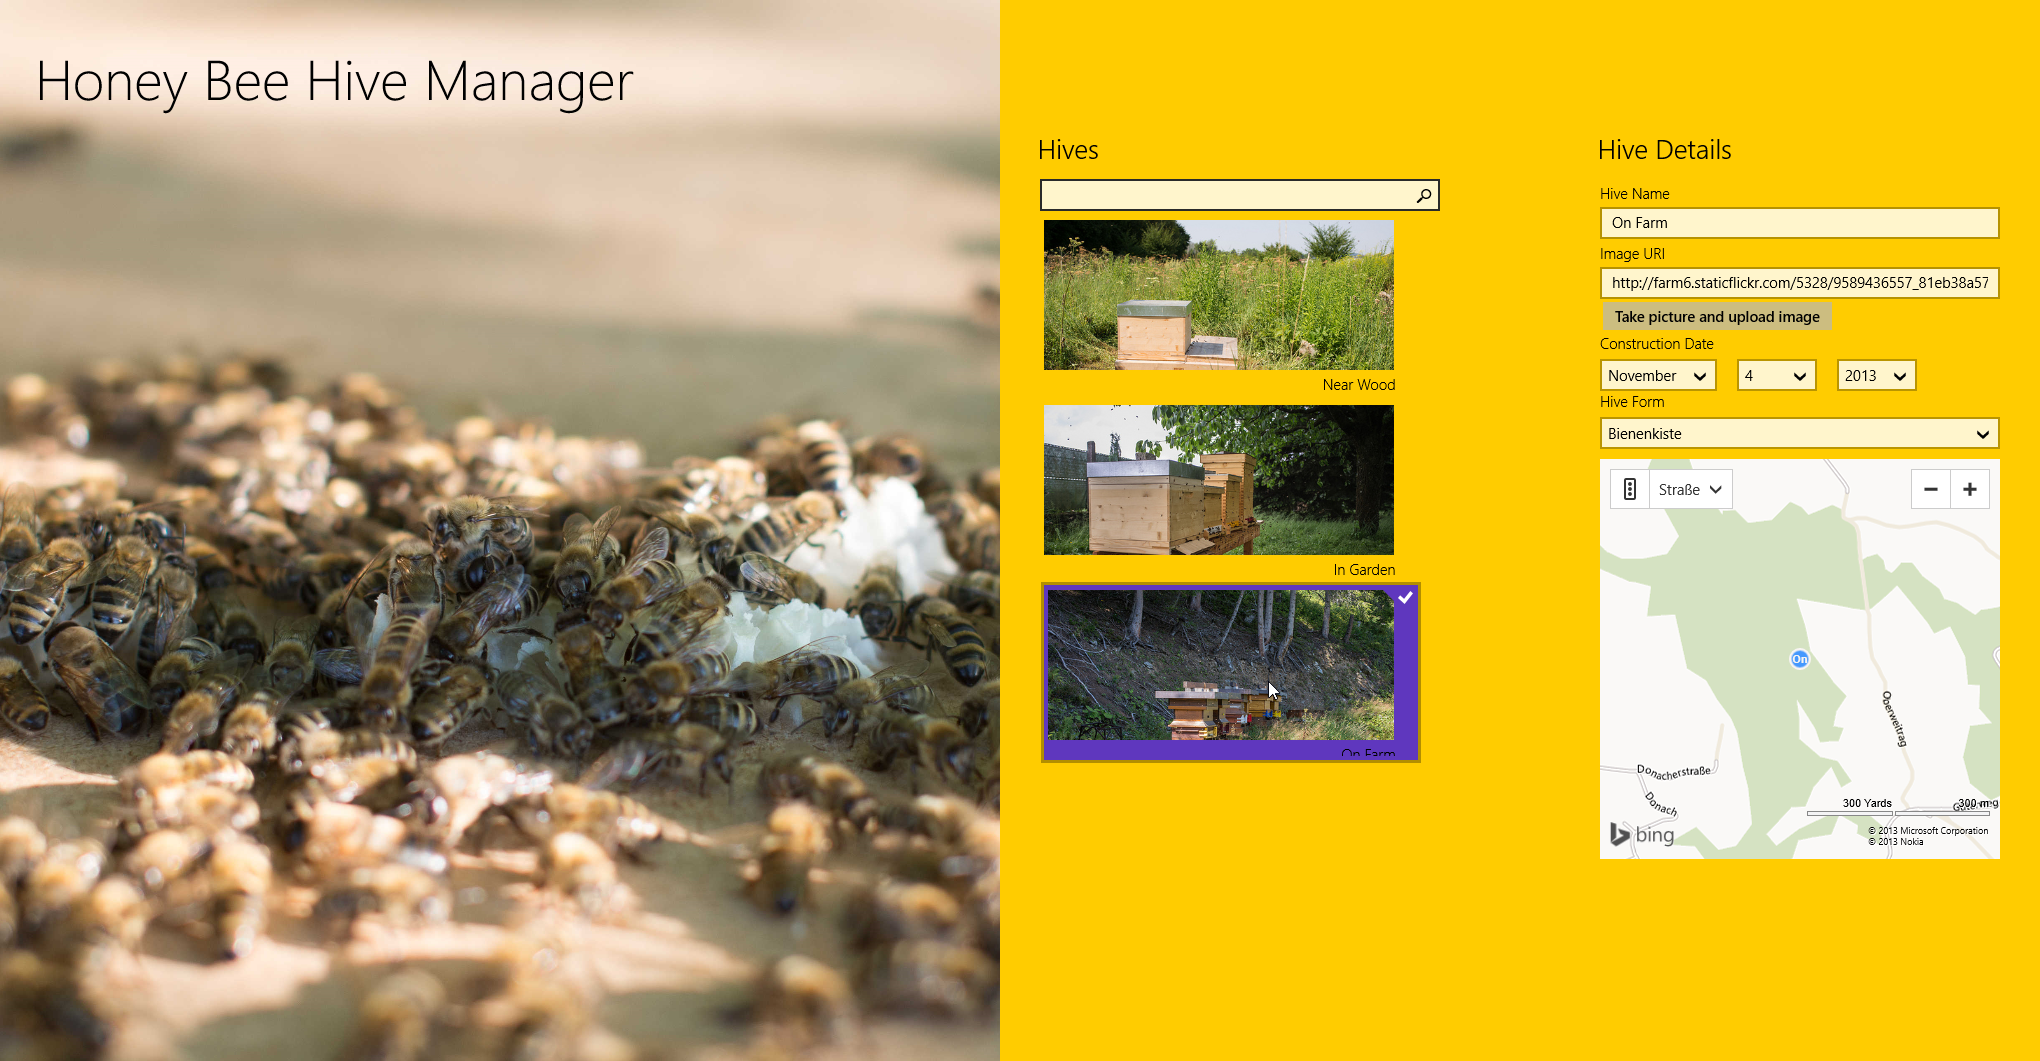
My goal in this session was to put a lot of Windows 8.1 + VS2013 + Azure Mobile Services news into one sample. As my hobby is bee keeping, I decided to build a "hive manager". This is how the app should look like (click to enlarge):
The sample demonstrates the following topics:
- Setting up a new Windows Store app in Visual Studio 2013
- Providing visual assets for new tile sizes
- Working with the new Hub control
- Adding an app bar using the new CommandBar class
- Adding Flyouts
- Accessing Windows Azure Mobile Services from Windows 8.1 Store apps
- Using Microsoft Accounts for authentication
- Adding and using the new Behavior SDK for Windows Store apps
- Using the new SearchBox for in-app search capabilities
- New Header and PlaceholderText properties
- New DatePicker control
Note that for this session I have picked just a few of the things that are new in Windows 8.1. If you want to have a more complete overview, check out the Windows 8.1 Feature Guide.
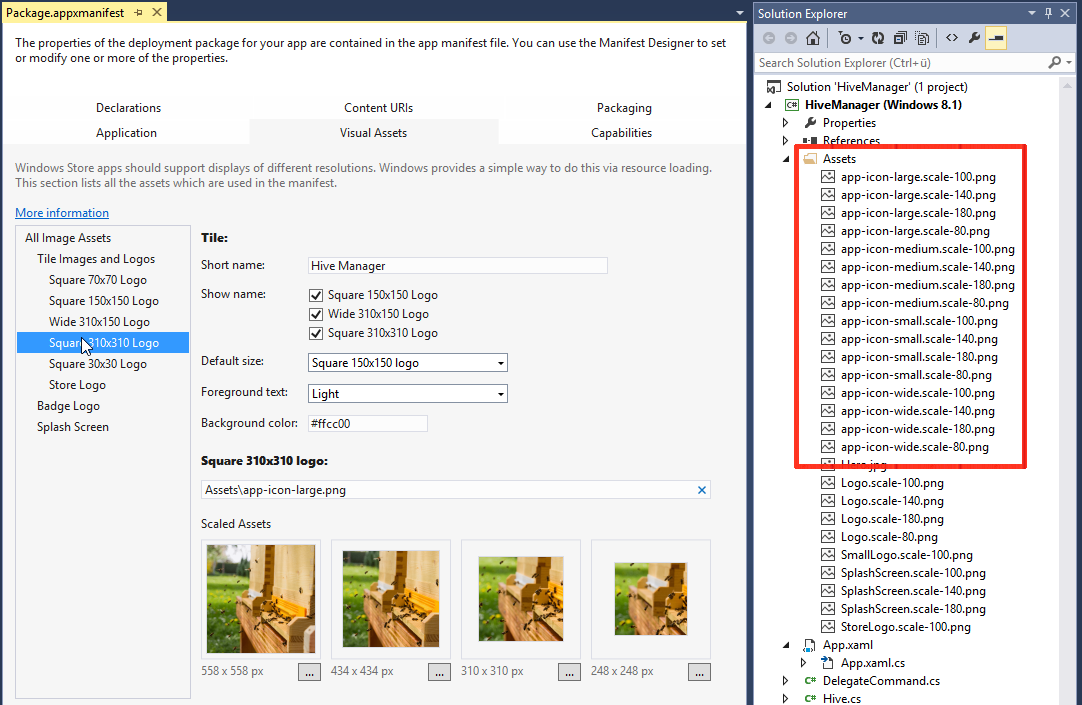
App Setup, New Tile Sizes
One of the nice new features in Windows 8.1 are the new tile sizes. My sample code makes use of them. The following screenshot shows how to set up the visual assets in Visual Studio 2013:
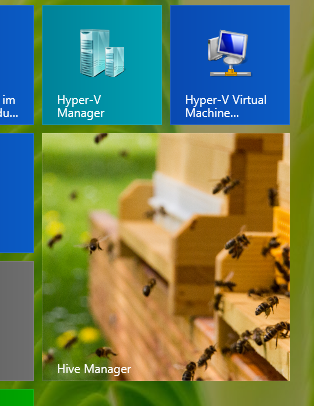
Here you see the large tile of our app in the Windows 8.1 start menu:
The New Hub Control
The new hub control makes it really easy to use the hub navigation pattern in Windows Store apps. In my app, I use the hub to display
- A "Hero" image to visually "pimp" my app
- A list of hives that I get from my Azure Mobile Services backend
- A detail form of the currently selected hive
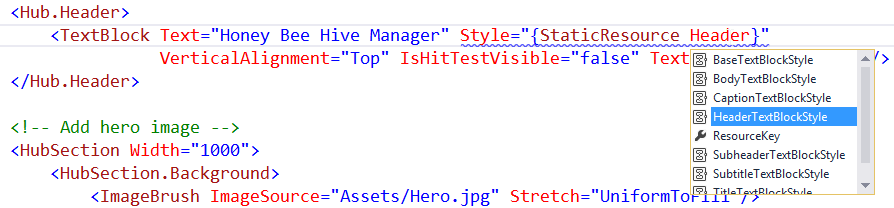
The following code snippet from MainPage.xaml shows how I use the new hub control. BTW - note how I use the new RequestedTheme attribute to switch the theme to "light". You could even switch between dark and light theme for a specific part of your control tree.
<Page ... RequestedTheme="Light">
    ...
    <Grid Background="{StaticResource MainWindowBackgroundBrush}">
        <!-- Use the new hub control -->
        <Hub>
            <!-- Page title -->
            <Hub.Header>
                <TextBlock Text="Honey Bee Hive Manager" ... />
            </Hub.Header>

            <!-- Add hero image -->
            <HubSection Width="1000">
                <HubSection.Background>
                    <ImageBrush ImageSource="Assets/Hero.jpg" ... />
                </HubSection.Background>
            </HubSection>

            <!-- List of bee hives -->
            <HubSection Header="Hives">
                <DataTemplate>
                    ...
                </DataTemplate>
            </HubSection>

            <!-- Details for selected hive -->
            <HubSection Visibility="{Binding Path=HiveDetailsVisible}" Header="Hive Details" ...>
                <DataTemplate>
                    ...
                </DataTemplate>
            </HubSection>
        </Hub>
    </Grid>
</Page>
MVVM - Model-View-ViewModel
Of course I separate view and logic for the view ("ViewModel") into two separate classes. The ViewModel could be reused on different platforms (e.g. WPF, Silverlight, with Xamarin even Android or iOS) to a large degree.
During my session I pointed out a specific feature regarding MVVM: The ability to use an instance of the ViewModel in Visual Studio to support the visual design of your app. Additionally having access to the ViewModel in Visual Studio greatly enhances your Intellisense experience. Here is the relevant code snippet (look for the XML namespace d):
<Page ...
    x:Class="HiveManager.MainPage"
    xmlns="http://schemas.microsoft.com/winfx/2006/xaml/presentation"
    xmlns:x="http://schemas.microsoft.com/winfx/2006/xaml"
    xmlns:local="using:HiveManager"
    xmlns:d="http://schemas.microsoft.com/expression/blend/2008"
    ...
    mc:Ignorable="d"
    RequestedTheme="Light"
    d:DataContext="{d:DesignInstance Type=local:MainPageViewModel, IsDesignTimeCreatable=True}">
    ...
</Page>
BTW - while playing around with my sample, did you notice Intellisense for the StaticResource markup extension? That's an awesome new feature in VS2013! If you like it, try F12 (go to definition). Yes, it finally works even in XAML and even for built-in styles like e.g. HeaderTextBlockStyle :-)
The new CommandBar , Flyouts
Like the Hub control makes it easy to build navigation, the CommandBar greatly simplifies adding app bars to your app. In Windows 8.1, the amount of XAML you have to write has reduced massively compared to the previous version. Here is a code snippet that adds a command bar to our app:
<Page ...>
<!-- Use the new command bar of win 8.1 to add an app bar -->
<Page.BottomAppBar>
<CommandBar>
<AppBarButton x:Uid="Add" Icon="Add" Label="Add" />
<CommandBar.SecondaryCommands>
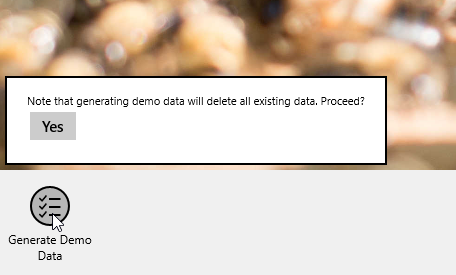
<AppBarButton Icon="Bullets" Label="Generate Demo Data">
<!-- Notice the use of an attached flyout -->
<AppBarButton.Flyout>
<Flyout>
<StackPanel>
<TextBlock Text="Note that generating demo data will delete all existing data. Proceed?" />
<Button Content="Yes" Command="{Binding Path=GenerateDemoDataCommand}" />
</StackPanel>
</Flyout>
</AppBarButton.Flyout>
</AppBarButton>
</CommandBar.SecondaryCommands>
</CommandBar>
</Page.BottomAppBar>
<Grid Background="{StaticResource MainWindowBackgroundBrush}">
...
</Grid>
</Page>This sample code also shows another feature of Windows 8.1: Flyouts. They are very handy for confirmation messages as the one showed above. They can even contain more complex UI (e.g. check boxes, etc.). Here you see the flyout in action:
Behavior SDK
In some areas, WinRT has a built-in mechanism for triggering ViewModel-code in response to user interaction. The Click event of a Button is one example that you are probably familiar with. Instead of writing code in the View which more-or-less just forwards the event to a ViewModel-method, you use a binding in the Command property referring to an implementation of ICommand. My sample includes this way of data binding in multiple places. Here is a short XAML snippet that shows what I mean:
<Flyout>
    <StackPanel>
        <TextBlock Text="Note that generating demo data will delete all existing data. Proceed?" />
        <Button Content="Yes" Command="{Binding Path=GenerateDemoDataCommand}" />
    </StackPanel>
</Flyout>
To simplify the implementation of the ViewModel, I built a DelegateCommand helper class. Note that in practise you do not need to implement it yourself. Use an MVVM framework like Prism, MVVMLight, etc. instead.
using System;
using System.Windows.Input;

namespace HiveManager
{
    public class DelegateCommand : ICommand
    {
        private Action execute;
        private Func<bool> canExecute;

        public DelegateCommand(Action execute, Func<bool> canExecute)
        {
            this.execute = execute;
            this.canExecute = canExecute;
        }

        public bool CanExecute(object parameter)
        {
            if (this.canExecute != null)
            {
                return this.canExecute();
            }

            return true;
        }

        public void RaiseCanExecuteChanged()
        {
            if (this.CanExecuteChanged != null)
            {
                this.CanExecuteChanged(this, EventArgs.Empty);
            }
        }

        public event EventHandler CanExecuteChanged;

        public void Execute(object parameter)
        {
            if (this.execute != null)
            {
                this.execute();
            }
        }
    }
}
Inside the ViewModel, I use the DelegateCommand to create an ICommand property for data binding:
using ...

namespace HiveManager
{
    public class MainPageViewModel : INotifyPropertyChanged
    {
        public MainPageViewModel()
        {
            ...
            this.GenerateDemoDataCommand = new DelegateCommand(this.GenerateDemoData, () => true);
            this.TakePictureAndUploadCommand = new DelegateCommand(this.TakePictureAndUpload, () => true);
        }

        public ICommand GenerateDemoDataCommand { get; private set; }

        private async void GenerateDemoData()
        {
            ...
        }

        public ICommand TakePictureAndUploadCommand { get; private set; }

        public async void TakePictureAndUpload()
        {
            ...
        }

        ...
    }
}
If you want to call a ViewModel-method in response to an event other than Button.Click, many people write code in the view's code behind file. In WPF there has been a better way for quite a long time: Behaviors. Behaviors are objects that you attach to a UI element. They catch a specified event and perform an action that you specify (e.g. calling a method in the ViewModel). Visual Studio 2013 comes with a Behavior SDK for Windows Store apps. So finally you can program in this nice way in your Windows Store apps, too.
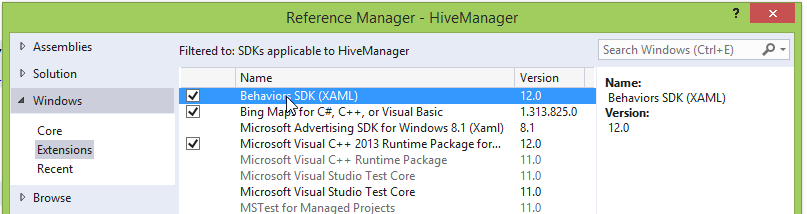
The screen shot above shows how you add a reference to the new Behavior SDK. The following XAML snippet shows how I use it in my sample to trigger authentication when the app has been loaded:
<Page ...>
    ...
    <!-- User behavior SDK to let user authenticate immediately after app startup -->
    <Interactivity:Interaction.Behaviors>
        <Core:EventTriggerBehavior EventName="Loaded">
            <Core:CallMethodAction MethodName="Authenticate" TargetObject="{Binding}" />
        </Core:EventTriggerBehavior>
    </Interactivity:Interaction.Behaviors>
    ...
</Page>
Authentication
The authentication itself is provided by Windows Azure Mobile Services. If you want this kind of authentication in your app, too, you have to follow these steps:
-
Perform the necessary steps to register for a developer API key for your selected authentication provider (e.g. Facebook, Google, Microsoft Account). In my case, I use a Microsoft Account for authentication. Therefore I had to go to Microsoft's Live Connect Developer Center, register, and create an account for my app. You have to do similar things if you choose Facebook or Google.
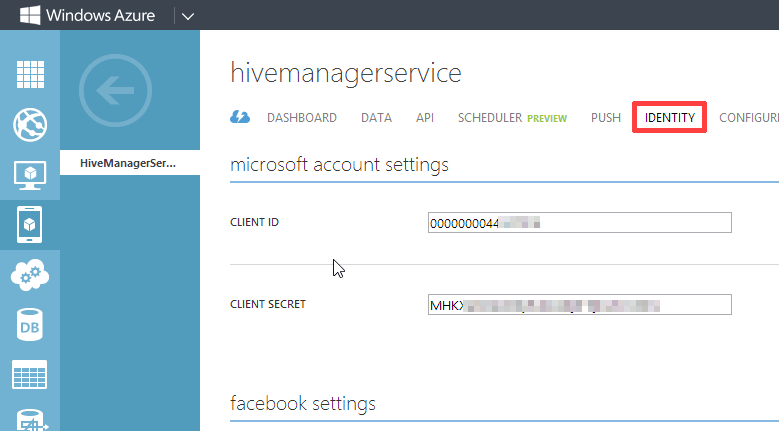
-
Next you have to enter the provider-specific API credentials in the Windows Azure Mobile Services Portal. The following screenshot shows where this is done e.g. for Microsoft Accounts:
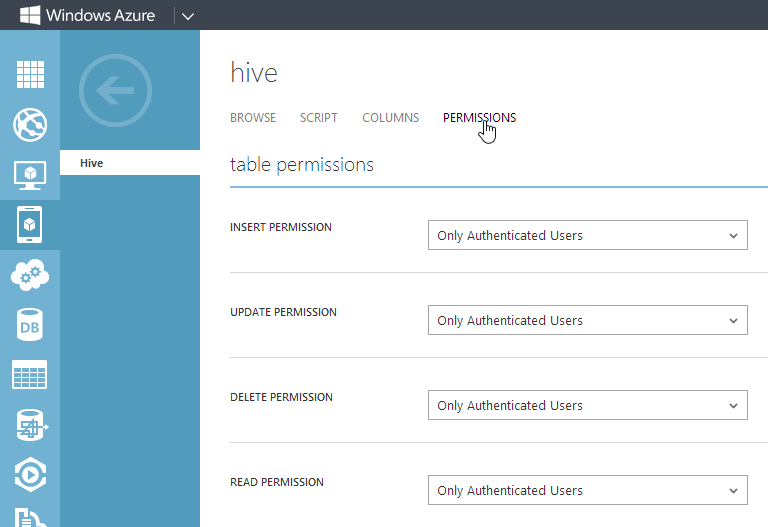
-
Once this is done, you can set the permission level for accessing your Azure Mobile Services tables to Only Authenticated Users.
-
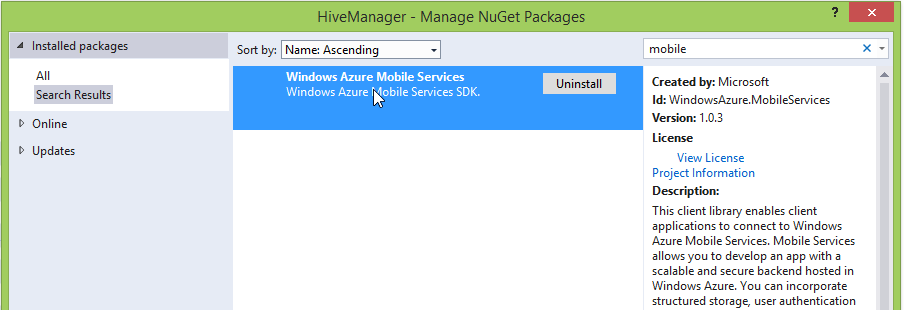
Add the Windows Azure Mobile Services NuGet package to your application. As this package contains a Portable Class Library, it can easily be used in a Windows Store app.
If you have successfully completed above steps, it is really simple to add authentication code to your ViewModel:
private MobileServiceUser user = null;

public bool IsAuthenticated
{
    get
    {
        return this.user != null;
    }
}

public async void Authenticate()
{
    while (user == null)
    {
        try
        {
            this.user = await App.MobileService.LoginAsync(MobileServiceAuthenticationProvider.MicrosoftAccount);
            this.RaisePropertyChanged("IsAuthenticated");
            this.RefreshHives();
        }
        catch (InvalidOperationException)
        {
            this.user = null;
        }
    }
}
The behavior in the XAML file will trigger the Authenticate method in the ViewModel whenever the Loaded event of the Page will occur. As a result, your user is presented with the typical login screen for Microsoft Accounts. Subsequent calls to the mobile services referenced by App.MobileService will automatically pass the identity of the user via the corresponding REST calls. If all this is new for you, I encourage you to download an HTTP debugger like Fiddler and watch the HTTP traffic. Here is a screenshot of the Mobile Services traffic in Fiddler (click to enlarge):

Data Access Using Windows Azure Mobile Services Tables
The data itself is stored in Mobile Services tables. In our simple example it is just one table. The following class shows its structure:
using Newtonsoft.Json;
using System;

namespace HiveManager
{
    public class Hive
    {
        public int Id { get; set; }

        [JsonProperty(PropertyName = "name")]
        public string Name { get; set; }

        [JsonProperty(PropertyName = "imageUri")]
        public string ImageUri { get; set; }

        [JsonProperty(PropertyName = "lat")]
        public double Lat { get; set; }

        [JsonProperty(PropertyName = "long")]
        public double Long { get; set; }

        [JsonProperty(PropertyName = "constructionDate")]
        public DateTimeOffset ConstructionDate { get; set; }

        public enum HiveForms { Bienenkiste, Dadant }

        [JsonProperty(PropertyName = "hiveForm")]
        public HiveForms HiveForm { get; set; }
    }
}
The code used to retrieve hive data rows via REST is simple:
private IEnumerable<Hive> HivesValue;
public IEnumerable<Hive> Hives
{
    get
    {
        return this.HivesValue;
    }

    set
    {
        if (this.HivesValue != value)
        {
            this.HivesValue = value;
            this.RaisePropertyChanged();
        }
    }
}

public async void RefreshHives()
{
    // Use mobile service api to query hives
    var table = App.MobileService.GetTable<Hive>();
    if (!string.IsNullOrEmpty(this.QueryText))
    {
        // Respect current query text
        this.Hives = await table.Where(h => h.Name == this.QueryText).ToCollectionAsync(); ;
    }
    else
    {
        this.Hives = await table.ToCollectionAsync();
    }
}
In-app Search
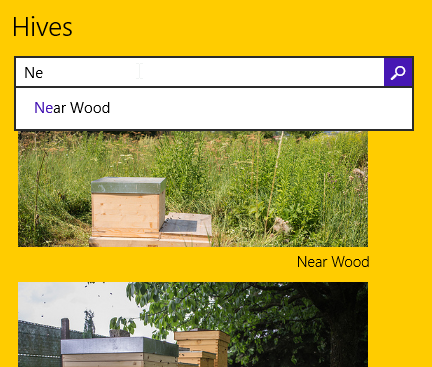
You might have noticed that the RefreshHives method contains a Where clause (again, I recommend to check out the corresponding HTTP traffic in Fiddler for people who are new with REST). The reason for this is that our app supports in-app search. This is also new to Windows 8.1. Before, Microsoft encouraged all developers to add search capabilities only by supporting the WinRT Search Contract. You can still do that. However, Microsoft added special support for in-app search with the new SearchBox control.
Here is a XAML snippet that shows how to add the SearchBox to your app (note the use of behaviors to trigger RefreshHives whenever the QuerySubmitted event occurs:
<HubSection Header="Hives">
    <DataTemplate>
        <Grid HorizontalAlignment="Stretch" Width="400">
            <Grid.RowDefinitions>
                <RowDefinition Height="Auto" />
                <RowDefinition Height="*" />
            </Grid.RowDefinitions>
            <!-- Add in-app search capabilities -->
            <SearchBox HorizontalAlignment="Stretch" SuggestionsRequested="SuggestionsRequested"
                       QueryText="{Binding Path=QueryText, Mode=TwoWay}" SearchHistoryEnabled="False">
                <Interactivity:Interaction.Behaviors>
                    <Core:EventTriggerBehavior EventName="QuerySubmitted">
                        <Core:CallMethodAction MethodName="RefreshHives" TargetObject="{Binding}" />
                    </Core:EventTriggerBehavior>
                </Interactivity:Interaction.Behaviors>
            </SearchBox>

            <ListView x:Name="ImagesGrid" ItemsSource="{Binding Source={StaticResource Hives}}"  SelectionMode="Single"
                  SelectedItem="{Binding Path=SelectedHive, Mode=TwoWay}" Grid.Row="1">
                ...
            </ListView>
        </Grid>
    </DataTemplate>
</HubSection>
To keep the sample simple, I added one little function to the view's code behind:
public async void SuggestionsRequested(object pane, SearchBoxSuggestionsRequestedEventArgs ea)
{
    // Use deferral object to indicate that the request is NOT completed when the
    // event handler exits. It will continue until the async request completes.
    var deferral = ea.Request.GetDeferral();
    try
    {
        ea.Request.SearchSuggestionCollection.AppendQuerySuggestions(await this.ViewModel.QueryHiveNames(ea.QueryText));
    }
    finally
    {
        deferral.Complete();
    }
}
The core search logic can be found in the ViewModel:
public async Task<IEnumerable<string>> QueryHiveNames(string queryString)
{
    if (!string.IsNullOrEmpty(queryString))
    {
        // Query string is not empty --> Lookup hives async using web request
        return await App.MobileService.GetTable<Hive>()
            .Where(h => h.Name.StartsWith(queryString))
            .Select(h => h.Name)
            .ToCollectionAsync();
    }

    // Query string is empty --> return empty result
    return Enumerable.Empty<string>();
}
Here is how the search looks like in our app:
New and Enhanced Controls
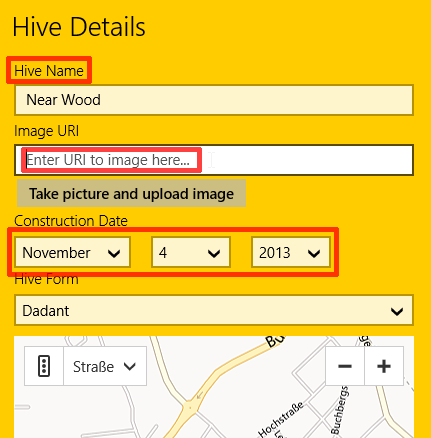
Windows 8.1 comes with quite some enhancements concerning controls used to implement forms. First you can now add a label to an input control just by settings its Header property. Additionally, many input controls support the PlaceholderText property to add a watermark. Last but not least, Windows 8.1 gives us a date and a time picker control :-) Here you see a screenshot with header, placeholder, and date picker:
During my session, I demonstrated these new features. Here is the XAML snippet that I used:
<!-- Details for selected hive -->
<HubSection Margin="80,0,0,0" Visibility="{Binding Path=HiveDetailsVisible}" Header="Hive Details">
    <DataTemplate>
        <StackPanel Width="400">
            <!-- Note usage of new Header and PlaceholderText properties -->
            <TextBox Header="Hive Name" Text="{Binding Path=SelectedHive.Name}" PlaceholderText="Enter hive name here..." />
            <TextBox Header="Image URI" Text="{Binding Path=SelectedHive.ImageUri}" PlaceholderText="Enter URI to image here..." />
            <Button Content="Take picture and upload image" Command="{Binding Path=TakePictureAndUploadCommand}" />
            <DatePicker Header="Construction Date" Date="{Binding Path=SelectedHive.ConstructionDate}"
                        CalendarIdentifier="GregorianCalendar" DayFormat="{}{day.integer}" />
            <ComboBox Header="Hive Form" PlaceholderText="Select hive form..."
                      ItemsSource="{Binding Path=HiveForms}"
                      SelectedItem="{Binding Path=SelectedHive.HiveForm, Mode=TwoWay}" />

            <!-- Comment: Map is generated in code for demo purposes -->
            <ContentControl Content="{Binding Path=HiveMap.Value}" MinHeight="400" Margin="0, 10, 0, 10" MinWidth="400"
                            HorizontalAlignment="Stretch" VerticalAlignment="Stretch" HorizontalContentAlignment="Stretch"
                            VerticalContentAlignment="Stretch"/>
        </StackPanel>
    </DataTemplate>
</HubSection>
Bonus: Mobile Services Custom API, Blob Storage
As you might have noticed, my app uses image URIs. In practice, it would be very unlikely that a user would be willing to upload his photos to a public webserver and copy/paste URIs to his photos into our app. To solve this problem, I have sketched a solution allowing the user to take a photo with his Windows 8.1 tablet and upload it to Windows Azure Blob Storage.
The challenge with Blob Storage is security. Of course it would not be ok to give write access to our blob storage account to everybody. Unfortunately, blob storage does not support federated identity (e.g. Microsoft Account) like Mobile Services. The solution are Shared Access Signatures (SAS). SAS are digitally signed URIs that enable the retriever of the URI to read and/or write to a blob for a certain amount of time (typically just enough time that is necessary to upload the content).
The problem is that getting the SAS cannot be done inside our app because it requires admin access to the blob storage account. We need a service in the cloud generating the SAS. Luckily Mobile Services support custom APIs which can be protected by federated identity and can access the blob API in order to generate an SAS.
Here is the JavaScript code I used to generate the SAS in an Azure Mobile Services custom API. Enter it directly in the Azure portal in the API menu of your mobile service:
var azure = require('azure');
var qs = require('querystring');

exports.get = function(request, response) {
    var accountName = '...yourAccountName...';
    var accountKey = '...yourAccountKey...';
    var containerName = 'images';
    var host = accountName + '.blob.core.windows.net';
    var imageName = request.query.imageName;

    var blobService = azure.createBlobService(accountName, accountKey, host);
    var sharedAccessPolicy = {
        AccessPolicy: {
            Permissions: azure.Constants.BlobConstants.SharedAccessPermissions.WRITE,
            Expiry: new Date(new Date().getTime() + 5 * 60 * 1000)
        }};

    // Generate the upload URL with SAS for the new image.
    var sasQueryUrl =
        blobService.generateSharedAccessSignature(containerName,
            imageName, sharedAccessPolicy);

    // Set the query string.
    var sasQueryString = qs.stringify(sasQueryUrl.queryString);

    // Set the full path on the new new item,
    // which is used for data binding on the client.
    var imageUri = sasQueryUrl.baseUrl + sasQueryUrl.path;

    response.send(statusCodes.OK, { 'sasQueryString': sasQueryString, 'imageUri': imageUri });
};
Once you have your custom API up and running, it is easy to call it from your app and use the SAS to upload the image:
public async void TakePictureAndUpload()
{
    var camera = new CameraCaptureUI();
    camera.PhotoSettings.Format = CameraCaptureUIPhotoFormat.Jpeg;
    var media = await camera.CaptureFileAsync(CameraCaptureUIMode.Photo);
    var imageName = "image_" + Guid.NewGuid().ToString().Replace("-", "") + ".jpg";

    var parameters = new Dictionary<string, string>();
    parameters.Add("imageName", imageName);
    var resultJson = await App.MobileService.InvokeApiAsync("getsasforimage", HttpMethod.Get, parameters);
    var result = JsonConvert.DeserializeObject<SharedAccessSignatureInformation>(resultJson.ToString());

    if (!string.IsNullOrEmpty(result.SasQueryString.ToString()))
    {
        // Get the new image as a stream.
        using (var fileStream = await media.OpenReadAsync())
        {
            var uploader = new BackgroundUploader();
            uploader.Method = "PUT";
            var targetUri = new Uri(result.ImageUri + "?" + result.SasQueryString, UriKind.Absolute);
            var upload = await uploader.CreateUploadFromStreamAsync(targetUri, fileStream);
            var operation = await upload.StartAsync();
        }
    }

    // Todo: Change ImageUri of hive to new image in the cloud
}
Feedback? Questions?
I hope that you find my content useful and relevant. Feel free to use the comments section below to give feedback or ask questions.
Content