Caching in ASP.NET
19 January 2008 - ASP.NET
There are a lot of ways to improve performance in web applications. One of the simplest but most effective methods is to cache images on the client. In this article I would like to show how we implemented image caching for our DotNetNuke website.
- The Problem
- Caching Images in IIS
- Caching Images with a Custom HttpHandler
- Defining Custom Configuration Sections in web.config
- Testing the CachingHandler
You may download the complete project or only the compiled assembly and use them in your own projects:
- Complete source code - 75 KB
- Compiled assembly - 3 KB
The Problem
When I was building the website http://www.software-architects.com I used a lot of images in the css style sheets to display background images for menu items. After transfering the files to our web server I tested how much traffic a request to our start page would produce. With Microsoft Network Monitor 3.1 I recorded a call to http://www.software-architects.com. As a result I got 20 requests to 20 different files to display one single page. Microsoft Network Monitor shows that appoximatly half of the requests are required for the menu images.
Microsoft Network Monitor is a Tool to allow capturing and protocol analysis of network traffic. You can download it from the Microsoft Download Center.

There are two different ways to avoid this problem. On the one hand you can tell IIS to cache images on the client, and on the other hand you can do this directly in ASP.net (which is a bit more complicated).
Caching Images in IIS
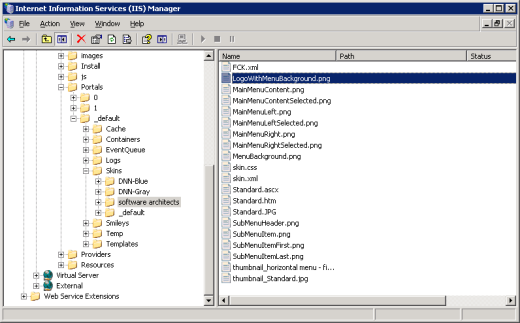
Caching in IIS is very simple. Select a folder in the left pane or a single file in the right pane and open the properties dialog.
Check "Enable content expiration" and choose when your content should expire.
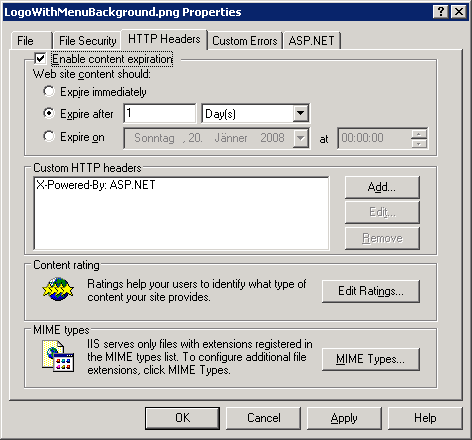
That's it! IIS tells the client with the "Cache-Control" header that the content may be cached on the client. The "Expires" header contains the expiration date. So the client knows that after this date it has to ask the server for the new content.
This approach works very well if
- you can place all your images and other cachable files in one or a few folders,
- and, most important, you have access to the IIS.
Both conditions are not fulfilled in our case. In our DotNetNuke project images are spread accross multiple folders so it would be quite complex to configure IIS. And more important, our hosting provider does not give us access to IIS. Thus I had to look for another solution.
Caching Images with a Custom HttpHandler
You can find a good article about IHttpHandler at the APress web site: Use local scope to improve performance.
First thing I had to solve was to bypass IIS to get the request to ASP.NET. I deciced to write a custom http handler which listens to files with the paths *.gif.ashx, *.jpg.ashx and *.png.ashx. Therefore I built a new class library project in Visual Studio with a class CachingHandler, which is responsible for handling requests to images. CachingHandler implements the interface IHttpHandler like the Page class does. The interface provides the propertyIsReusable and the method ProcessRequest.
IsResuable indicates if another request can reuse the http handler. This means, we have to guarantee that the ProcessRequest method is threadsafe.
ProcessRequest does the real work. It gets the current context and is responsible for sending the result to the client.
Download complete code for CachingHandler.cs.
namespace SoftwareArchitects.Web
{
  public class CachingHandler : IHttpHandler
  {
    public bool IsReusable
    {
      get { return true; }
    }

    public void ProcessRequest(HttpContext context)
    {
      ...
    }
  }
}
We want our http handler to send a file to the client. As we are listening to files with the paths *.gif.ashx, *.jpg.ashx and *.png.ashx, all we have to do is to remove the ".ashx" from the request path to get the file we want to send to the client. Besides we extract the filename and the extension from the file.
public void ProcessRequest(HttpContext context)
{
  string file = context.Server.MapPath
    (context.Request.FilePath.Replace(".ashx", ""));
  string filename = file.Substring(file.LastIndexOf('\\') + 1);
  string extension = file.Substring(file.LastIndexOf('.') + 1);
I will show you the code for the class CachingSection a little bit later.
In the next step we load the configuration for the CachingHandler from the web.config file. Therfore I built a class CachingSection, which contains a property CachingTimeSpan and a collection FileExtensions, which knows the content type for each file extension. With help of this config class we configure the HttpCachePolicy object of the response:
- SetExpires tells the client how long the content should be valid.
- SetCacheability tells the client who is allowed to cache the content. We set the the cacheability to public. This means that the response is cacheable by clients and shared (proxy) caches.
- SetValidUnitExpires specifies whether the ASP.NET cache should ignore HTTPCache-Control headers sent by the client that invalidate the cache.
- ContentType sets the MIME type of the response.
  CachingSection config = (CachingSection)context.GetSection
    ("SoftwareArchitects/Caching");
  if (config != null)
  {
    context.Response.Cache.SetExpires
      (DateTime.Now.Add(config.CachingTimeSpan));
    context.Response.Cache.SetCacheability(HttpCacheability.Public);
    context.Response.Cache.SetValidUntilExpires(false);

    FileExtension fileExtension = config.FileExtensions[extension];
    if (fileExtension != null)
    {
      context.Response.ContentType = fileExtension.ContentType;
    }
  }
Finally we add the content-disposition header to the response to tell the client that it should open the file in the browser (inline). Additionally we set the filename to the name without the extension .ashx, because this is the name, that will be displayed when you try to download the file. Then we use WriteFile to send the file to the client.
  context.Response.AddHeader("content-disposition",
    "inline; filename=" + filename);
  context.Response.WriteFile(file);
}
Defining Custom Configuration Sections in web.config
In the http handler we used a custom class to read some configuration information from the web.config file. Therfore I built the class CachingSection derived fromConfigurationSection. In this class I implemented a property CachingTimeSpan, which holds a TimeSpan value for the time to cache objects on the client, and a propertyFileExtensions, which holds a collection of FileExtension objects. To map these properties to elements in web.config you simply have to add a ConfigurationPropertyattribute to each property, which can be set in web.config.
Download complete code for CachingSection.cs.
namespace SoftwareArchitects.Web.Configuration
{
  /// <summary>
  /// Configuration for caching
  /// </summary>
  public class CachingSection : ConfigurationSection
  {
    [ConfigurationProperty("CachingTimeSpan", IsRequired = true)]
    public TimeSpan CachingTimeSpan
    {
      get { return (TimeSpan)base["CachingTimeSpan"]; }
      set { base["CachingTimeSpan"] = value; }
    }

    [ConfigurationProperty("FileExtensions", IsDefaultCollection = true,
      IsRequired = true)]
    public FileExtensionCollection FileExtensions
    {
      get { return ((FileExtensionCollection)base["FileExtensions"]); }
    }
  }
To support not only single values but also collections we have to implement a class derived from ConfigurationElementCollection. In our sample we need a collection to configure a list of valid extensions with their corresponding content types.
  /// <summary>
  /// List of available file extensions
  /// </summary>
  public class FileExtensionCollection : ConfigurationElementCollection
  {
    ...
  }
Finally we need a class for each extension, which holds a property for the extension and a property for the content type.
  /// <summary>
  /// Configuration for a file extension
  /// </summary>
  public class FileExtension : ConfigurationElement
  {
    [ConfigurationProperty("Extension", IsRequired = true)]
    public string Extension
    {
      get { return (string)base["Extension"]; }
      set { base["Extension"] = value.Replace(".", ""); }
    }

    [ConfigurationProperty("ContentType", IsRequired = true)]
    public string ContentType
    {
      get { return (string)base["ContentType"]; }
      set { base["ContentType"] = value; }
    }
  }
}
All we have to do now is to add a configuration section to our web.config. In the configSections tag we add a new sectionGroup with the name SoftwareArchitects. In this group we add a section named Caching. The attribute type specifies the class and the assembly of our CachingSection class. Of course we have to add the assembly with theCachingSection class to the bin folder of the web application. Then we can add a new tag with the name of the group to the configuration tag. Inside of the group we add a new tag with the name of the section, and in this section all properties we have defined in theCachingSection class are now available.
<configuration>
  <configSections>
    <sectionGroup name="SoftwareArchitects">
      <section name="Caching" requirePermission="false"
        type="SoftwareArchitects.Web.Configuration.CachingSection,
        SoftwareArchitects.Web.CachingHandler" />
    </sectionGroup>
  </configSections>

  <SoftwareArchitects>
    <Caching CachingTimeSpan="1">
      <FileExtensions>
        <add Extension="gif" ContentType="image\gif" />
        <add Extension="jpg" ContentType="image\jpeg" />
        <add Extension="png" ContentType="image\png" />
      </FileExtensions>
    </Caching>
  </SoftwareArchitects>

  ...
Now there is only one last thing missing until we can use the CachingHandler. We have to add it to the httpHandlers section in web.config. There we have to add an entry for each file extension we want to map to our http handler. I decided to support images with the extensions .gif, .jpg and .png. So I added a handler for the paths *.gif.ashx, *.jpg.ashx and *.png.ashx. In the type attribute I specified class and assembly of the http handler. Of course the assembly must be placed in the bin folder as well.
You could also use other file extensions like *.gifx. But to do so you need to have access to IIS to configure the new extension to be handeled by the aspnet_isapi.dll. As I do not have access to the IIS of our hosting provider, I had to use *.ashx, because it is already mapped to aspnet_isapi.dll.
  <httpHandlers>
    <add verb="*" path="*.gif.ashx"
      type="SoftwareArchitects.Web.CachingHandler,
      SoftwareArchitects.Web.CachingHandler"/>
    <add verb="*" path="*.jpg.ashx"
      type="SoftwareArchitects.Web.CachingHandler,
      SoftwareArchitects.Web.CachingHandler"/>
    <add verb="*" path="*.png.ashx"
      type="SoftwareArchitects.Web.CachingHandler,
      SoftwareArchitects.Web.CachingHandler"/>
  </httpHandlers>
</configuration>
Finally I added the extension .ashx to all images in the web site (in .css files and .aspx files). When I monitored a request to the main page of http://www.software-architects.com again, the first request still generated 20 requests to the web server but from the second request on it took only 7 requests to load the page, because the images were cached on the client.
You can see how it works right here in this article. Right-click on an image and open the properties dialog. You will see, that the URL ends with .ashx. When you right-click on an image and select "Save Picture as..." the suggested filename does not include the extension .ashx because of the content-disposition header.
Of course you can use the handler for other file types like javascript files of css files, too. So you could reduce the number of requests again.

Testing the CachingHandler
You can easily test the caching of images with a simple web site. I added a web site project with the name CachingWebSite to the Visual Studio Solution with which you can try how it works (download complete solution). On the one hand the web site contains a page Default.aspx, which contains an image tag. You can see that the image source ends with .ashx.
<img src="/Portals/1/App_Themes/Standard/Images/LogoWithMenuBackground.png.ashx" />On the other hand the web site contains a theme Standard with a stylesheet Style.css. In the stylesheet I use a background image. Again the image source ends with .ashx.
body
{
  margin: 0px;
  padding: 0px;
  background-image: url(Images/MenuBackground.png.ashx);
  background-repeat: repeat-x;
}
In the web.config of the web site I inserted a custom section to configure the CachingHandler and a http handler for each extension, exactly as explained above. Furthermore I added the trace tag to the system.web section to trace every request to a file.
<trace enabled="true" pageOutput="false" requestLimit="50" mostRecent="true" />When I start my web site project I see the Default.aspx page with the logo, which is defined in Default.aspx, and with the background image, which is defined in the stylesheet.

To view the trace I opened a new tab in IE and replaced Default.aspx with Trace.axd in the URL. The trace shows that four request were necessary to display the page Default.aspx.
For the first request and every time the users hits F5 all files are sent to the client.

When I switch back to the first tab I have three possibilities to reload the page. I could
- press F5
- click the "Reload page ..." link
- click the "Reload page ..." button
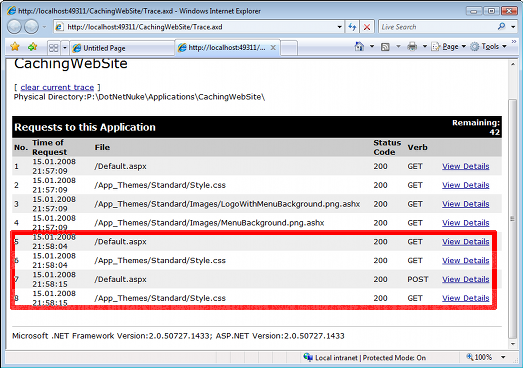
Pressing F5 would reload all the content, whereas clicking the link or the button would only reload content, which is not cached on the client. I clicked the link and the button for the following screenshot. As you can see there were only requests to Default.aspx and Style.css added in the trace.
If the user navigates to a page via a hyperlink or does a post back only files which are not cached on the client are requested from the server. Request no. 5 and 6 were caused by clicking the link whereas request no. 7 and 8 were caused by clicking the button.
Content

Tags
.NET (40) ADC (1) Android (1) Angular (4) AngularJS (3) ASP.NET (7) ASPNET Core (1) ASPNET (1) Assembler (1) Azure (62) BASTA (2) Blazor (2) C# (35) C (1) CLI (2) Cloud (1) CoderDojo (1) Conferences and Workshops (2) Container (4) CPP (3) CSharp (5) DevOps (2) Docker (12) Documentation (1) DotNet (1) ECMAScript (1) GAB (1) HTML (2) HTML5 (2) Iron Python (1) JavaScript (3) JWT (1) Markdown (1) MEF (3) Microservices (3) Microsoft (2) Minecraft (2) Mobile (2) Node (1) Node.js (2) NPM (1) OData (5) Presentations (4) Project Management (2) Registry (1) Roslyn (2) Silverlight (3) Software Quality Days (1) SPA (1) SQL (3) SQLCE (1) SVG (1) TechDays (1) Techorama (1) Testing (1) TFS (9) time cockpit (4) TypeScript (18) Visual Studio (37) VSCode (1) VSTS (2) WebAssembly (2) Windows (1) WPF (9) Yarn (1)Authors
Related Posts
Techorama - Docker for Software Developers
12 May 2015 - ASP.NET
At Techorama conference in Belgium I do a session for developers who heard about Docker and wonder why it would be relevant for them. What is different about Docker? Why could it be useful for web developers? How can it be used on Azure? It is a Docker intro session in which I demo the application of Docker in web development scenarios. In this blog post I share my slides and samples.

Dotnet Cologne - OWIN and ASP.NET 5 Fundamentals (Video)
OWIN decouples ASP.NET web application from a specific web server like IIS. At this year's dotnet Cologne conference I spent an hour speaking about the fundamental ideas of OWIN. Additionally, I showed how the OWIN concepts translate to ASP.NET 5. As this was a code-only talk, I recorded the sessions. In this post you find the video (German).

Saving Money in the Cloud with Async Programming
03 September 2013 - .NET, ASP.NET, Azure, C#, SQL
Today I do a session at Herbstcampus Nürnberg about changes in .NET’s 4.5 Base Class Library (BCL). Of course the primary topic is async programming as this is by far the most important change. As always I try to demonstrate not only the pure technology. I want to show practical examples about how you benefit from it in everyday life.