Saving Money in the Cloud with Async Programming
03 September 2013 - .NET, ASP.NET, Azure, C#, SQL
Introduction
Today I do a session at Herbstcampus Nürnberg about changes in .NET’s 4.5 Base Class Library (BCL). Of course the primary topic is async programming as this is the by far most important change. As always I try to demonstrate not only the pure technology. I want to show practical examples about how you benefit from it in everyday life.
For async programming the first use case is quite simple and obvious: It enables you to build fast and fluid UI applications – desktop apps with WPF as well as store apps with WinRT – by putting operations with high latency (e.g. expensive database queries, web services, etc.) on background threads instead of the UI thread. However, today I want to go one step further and show how async programming can save you real money – in the cloud.
The business model of the cloud is based on variable cost. You pay only what you really use. Well, at least this is true in most of the cases. There are offerings in the wild where you buy reserved compute or storage capacity and get a reduced price for it. In such cases you are back in the world of fixed costs, at least on a short or medium term. However, independent of the pricing model you will save money if you write efficient programs. Either immediately if you can reduce the number of size of your computers in the cloud or on the longer terms if you can reduce your contracts about reserved capacities.
This thinking is quite new for traditional programmers who develop for on-premise data centers. They have to fight for budget when they have to buy or request the infrastructure for the environment their programs will run in. As developers we typically ask for more power than we really need, don’t we? We know that someone will cut the budget and give us slower machines. Additionally we sometimes hope to hide some inefficiencies behind big iron. Once we have our servers, no one cares how much we utilize them. Or did a controller ever ask you why the big server you requested only needs 5% CPU on average?
In the cloud developers can write real business cases showing the value of optimization. If you double the performance of an algorithm or reduce the memory footprint significantly, your colleagues in accounting will be quite happy because of a lower monthly invoice from your cloud provider. As a developer you can compare the cost of your development time with the reduced cost of cloud resources.
Async vs. Parallel Programming
In this article I am primarily talking about async programming, not about parallel programming. Many people mix up these two terms although they are quite different.
If you write a CPU-bound algorithm (e.g. image rendering, encrypt large amounts of data, etc.) and you have multiple cores in your computer, you will need to parallelize your program. This makes your program use all the available cores. Parallel programming is not simple. On the one hand you have to split your algorithm into pieces that can be processed independently – at least to a certain degree. At some points the results will have to be brought together. This results in coordination overhead. Often parallel algorithms have worse performance than serial ones because programmers underestimate this additional overhead. Above this it is easy to introduce errors in this coordination code pieces. Developers who do not write parallel programs every day often mess up with writing thread-safe algorithms.
Async programming is different. It is not about CPU-based algorithms, it is about high latency operations. Imagine you run your REST-based ASP.NET Web API in the cloud in Windows Azure Websites. The server that you use only have one – virtualized – CPU core. The main job of your Web API is to interact with a database. No complex calculations are involved. In such a case parallelization is seldom of great value (note that there are exceptions that I will not cover here). However, async programming is.
The IIS webserver working in your Windows Azure Website can handle a certain number of parallel requests. In fact every request is put in a queue and the queue is worked through by a pool of worker threads. The queue as well as the thread pool are quite large (e.g. max. thread pool size in .NET 4.5 is 5,000). So you might not care about it. However, if your database queries are complex and need some time to execute and you have significant traffic on your Web API, you will maybe run into some problems. Users might complain about HTTP errors because IIS will response with an error if the queues are full. Additionally you are burning money in the cloud because every thread in the thread pools needs memory (approx. 1MB of stack memory). If you are constantly using a huge thread pool, you will need big machines in the cloud. But why? All of your threads are bored, they are just waiting for the database. Entering async.
Async programming means that a thread can be freed from high latency operations by putting it to sleep. It will be awaken when the operation is completed. In the ASP.NET Web API and Windows Azure Website example above this means that IIS can reuse a thread that sleeps while waiting on the database. This results in a lower number of threads in the thread pool and therefore a smaller memory footprint. You can have less and/or smaller machines in the cloud and save money.
The same is true for UI applications. If you free your UI thread from blocking high latency operations, Windows can use it for e.g. smooth animations. You code will be awaken after the operation is finished. WinRT, the SDK for Windows Store apps, for example offers only async API methods for any operation that takes potentially more than 50ms to complete. You do not even have the option of a synchronous API call in this new world of Windows apps.
Simple Example to Begin
Enough theory. Let’s start with a simple example. It is just an introduction and does not deal with advanced things like Web API or Windows Store apps. If you are already somewhat familiar with the concept of async programming, you can skip this chapter.
Let’s start with this synchronous code:
private static void DownloadSomeTextSync()
{
    using (var client = new WebClient())
    {
        Console.WriteLine(
            client.DownloadString(new Uri(string.Format(
                "http://{0}",
                (Dns.GetHostAddresses("www.timecockpit.com"))[0]))));
    }
}
As you can see this code gets the IP address of a host name and downloads content using http. Doing these operations synchronously will block the thread for quite a long time as the public internet is involved.
Note that you have had the option to perform such high latency operations in the background already since the early days of .NET. You could for instance use the Begin/End methods with IAsyncResult as the following code shows. Note that DownloadSomeText is a synchronous method because it waits until everything is completed using an AutoResetEvent. However, it would be trivial to change the code so that it could do useful things during the download process.
private static void DownloadSomeText()
{
    var finishedEvent = new AutoResetEvent(false);

    // Notice the IAsyncResult-pattern here
    Dns.BeginGetHostAddresses("www.timecockpit.net", GetHostEntryFinished,
        finishedEvent);
    finishedEvent.WaitOne();
}

private static void GetHostEntryFinished(IAsyncResult result)
{
    var hostEntry = Dns.EndGetHostAddresses(result);
    using (var client = new WebClient())
    {
        // Notice the Event-based asynchronous pattern here
        client.DownloadStringCompleted += (s, e) =>
        {
            Console.WriteLine(e.Result);
            ((AutoResetEvent)result.AsyncState).Set();
        };
        client.DownloadStringAsync(new Uri(string.Format(
            "http://{0}",
            hostEntry[0].ToString())));
    }
}
Compare this code with our original synchronous implementation. Ugly, isn’t it? It is error prone, hard to read, hard to maintain, etc. There has to be a better way. Since .NET 4 there is one: The Task Asynchronous Pattern. .NET 4 introduced tasks and task-related APIs:
private static void DownloadSomeTextSync()
{
    var finishedEvent = new AutoResetEvent(false);

    Dns.GetHostAddressesAsync("www.timecockpit.com")
        .ContinueWith(dnsResultTask =>
            {
                using (var client = new WebClient())
                {
                    client.DownloadStringTaskAsync(new Uri(string.Format(
                        "http://{0}",
                        dnsResultTask.Result[0])))
                        .ContinueWith(downloadResultTask =>
                            {
                                Console.WriteLine(downloadResultTask.Result);
                                finishedEvent.Set();
                            });
                }
            });

    finishedEvent.WaitOne();
}
Note the use of the methods named with the postfix Task and the use of continuations with ContinueWith. However, the code shown above is by far not perfect. Error handling for instance is entirely missing. You should not write such code in production. I include it just to demonstrate the difference of the IAsyncResult pattern and the Task Asynchronous Pattern.
To get a really beautiful and elegant solution, we need the new C# keywords async and await with the associated extensions to .NET’s BCL. Here is the async code for our example:
private static async void DownloadSomeTextUsingTaskAsync()
{
    using (var client = new WebClient())
    {
        Console.WriteLine(
            await client.DownloadStringTaskAsync(new Uri(string.Format(
                "http://{0}",
                (await Dns.GetHostAddressesAsync("www.timecockpit.com"))[0]))));
    }
}
Compare this code with the synchronous version again. Doesn’t it look surprisingly similar? It does. This is the goal of async and await, making async programming so simple that everyone can use it in everyday programming.
Await vs. Wait
You are probably already familiar with the Wait family of methods of the Task Parallel Library (TPL). They allow you to wait until a task or a collection of tasks has been finished. You might wonder what’s the difference between await and Wait. The difference is huge.
While Wait blocks the thread, await does not block it. In fact .NET will return from the current method whenever it reaches an await statement. It will continue the execution with the code after (or around) the await statement when the background task has been finished.
The following example should demonstrate what I mean:
namespace ConsoleApplication1
{
    class Program
    {
        static void Main(string[] args)
        {
            Console.WriteLine("Starting");
            PerformHighLatencyOperationsAsync();
            while (true)
            {
                Console.WriteLine("Do something useful (e.g. handle other HTTP requests or display animation)...");
                Thread.Sleep(100);
            }
        }

        static async void PerformHighLatencyOperationsAsync()
        {
            var value = await PerformHighLatencyGetAsync();
            Console.WriteLine(await PerformHighLatencyPowerAsync(value));
        }

        private static Task<int> PerformHighLatencyGetAsync()
        {
            return Task.Run(() =>
                {
                    Thread.Sleep(1000);
                    return 42;
                });
        }

        private static Task<int> PerformHighLatencyPowerAsync(int value)
        {
            return Task.Run(() =>
                {
                    Thread.Sleep(1000);
                    return value * value;
                });
        }
    }
}
If you run this program you will see that the main method continues after it calls PerformHighLatencyOperationsAsync. This is the case because PerformHighLatencyOperationsAsync returns after it has reached the first await statement (in the line var value = await PerformHighLatencyGetAsync()). When PerformHighLatencyGetAsync returns, .NET will continue with the assignment operation value = await … and go to the next line of code.
If you would change the main method so that it uses TPL’s Wait method, the result is completely different.
static void Main(string[] args)
{
    Console.WriteLine("Starting");
    PerformHighLatencyOperationsAsync().Wait();
    while (true)
    {
        Console.WriteLine("Do something useful (e.g. handle other HTTP requests or display animation)...");
        Thread.Sleep(100);
    }
}

static async Task PerformHighLatencyOperationsAsync()
{
    var value = await PerformHighLatencyGetAsync();
    Console.WriteLine(await PerformHighLatencyPowerAsync(value));
}
…
You will still get the result of PerformHighLatencyOperationsAsync but the main thread is blocked until this method has finished. This is definitively not what we wanted.
Did you note that I changed the return type of PerformHighLatencyOperationsAsync to Task in the previous example? How can this work if the method does not explicitly return a Task object in its code? .NET is again doing the magic. When .NET reaches the first await statement, it does not only return from the corresponding method. It also automatically returns a Task on which the caller can e.g. wait. This fact will become important when we talk about async unit tests in a second.
Async Web API
Introduction
Now it is time to save money as promised. I will show you how to build an ASP.NET MVC Web API that can be deployed to Windows Azure Website. It will interact with a database. This means it contains high latency operations. In order to save resources in the cloud we need to program asynchronously. Thanks to Entity Framework 6 this can be done using the Task Asynchronous Pattern introduced before.
Step 1: Create ASP.NET MVC 4 Project
The first step is creating an ASP.NET MVC 4 Web API project (click to enlarge image):

I will not go into details about ASP.NET MVC 4. This is out of scope of this article. If this technology is new to you, I encourage you to read more about it in Microsoft’s MSDN library.
Step 2: Create Data Access Layer
Next we need to build a data access layer. In our case we create a very simple database with a single table storing blog posts. For demo purposes I will use blog posts from my private blog http://bienenimgarten.wordpress.com where my spouse and I write about gardening and bee keeping.
We start by adding Entity Framework 6 to our project.

You can easily search for “entity framework”. Make sure you select “Include Prerelease”.

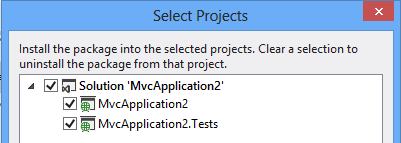
Make sure you add EF 6 to both projects in your solution:
Now we have EF 6 added to our project, we can build a data access layer. I will use the code first approach here and let EF create the necessary tables. Here is the class representing the database table for blog posts:
using System.ComponentModel.DataAnnotations;

namespace BeeInMyGarden.Data
{
    public class BlogItem
    {
        [Key]
        public int BlogId { get; set; }

        [MaxLength(128)]
        public string Title { get; set; }

        public string Content { get; set; }

        [MaxLength(256)]
        public string FeaturedImageUri { get; set; }
    }
}
Here is the class representing our simple data access layer. The important point here is that our class uses EF’s async methods (e.g. ToArrayAsync). Additionally it contains async methods (e.g. GenerateDemoDataAsync) so that a caller can use async programming.
using System.Data.Entity;
using System.Linq;
using System.Threading.Tasks;

namespace BeeInMyGarden.Data
{
    public class BlogContext : DbContext
    {
        public BlogContext()
            : base("BlogDatabase")
        {
        }

        public DbSet<BlogItem> BlogItems { get; set; }

        /// <summary>
        /// Generates demo data
        /// </summary>
        /// <remarks>
        /// This demo data is taken from the blog http://bienenimgarten.wordpress.com
        /// </remarks>
        public async Task GenerateDemoDataAsync()
        {
            var existingBlogIds = await this.BlogItems.Select(b => b.BlogId).ToArrayAsync();

            if (!existingBlogIds.Contains(3))
            {
                var newItem = new BlogItem()
                {
                    BlogId = 3,
                    Title = "Der erste, selbst gefangene Bienenschwarm",
                    FeaturedImageUri = "http://bienenimgarten.files.wordpress.com/2013/06/img_1509.jpg?w=500",
                    Content = @"
Gestern war ein ereignisreicher Tag in unserem jungen Imkerleben. Als wir am Abend von einem Ausflug mit dem Moutainbike nach
Hause gekommen sind, erreichte uns ein Anruf vom Obmann unseres Imkervereins. Er wurde verständigt und um Hilfe gebeten, da
sich ganz in unserer Nähe ein Bienenscharm in einem privaten Garten niedergelassen hatte. Er fragte uns, um wir uns darum
kümmern möchten. Wow, das war eine unvorhergesehene Herausforderung. Wir hatten erst bei einem Schwarm – unserem eigenen – geholfen
und jetzt sollten wir uns gleich alleine um das Einfangen kümmern. Aber was soll’s, Erfahrung macht den Meister. Also haben
wir zugesagt und uns bei dem betroffenen Gartenbesitzer telefonisch angekündigt..."
                };

                this.BlogItems.Add(newItem);
                await this.SaveChangesAsync();
            }

            if (!existingBlogIds.Contains(2))
            {
                var newItem = new BlogItem()
                {
                    BlogId = 2,
                    Title = "Türe auf – eine vergrößerte Fluglochöffnung muss her",
                    FeaturedImageUri = "http://bienenimgarten.files.wordpress.com/2013/06/img_0804.jpg?w=500",
                    Content = @"
Türe auf!
---------

Endlich die erste richtig lange Schönwetterperiode. Die Bienen entwickeln sich im Moment prächtig. Vor dem Flugloch geht
es so richtig rund. Bei unserem gestrigen Bienenbesuch haben wir bemerkt, dass die kleine Fluglochöffnung im Moment ein
echter Engpass ist. Die Bienen müssen sich zum Rein- und Rausgehen richtig anstellen. Aus diesem Grund haben wir heute
einen Fluglochkeil mit größerer Öffnung gebastelt. Am Foto unten (anklicken zum Vergrößern) sieht man den Unterschied.
Der obere Fluglochkeil ist der, den man mit der Dadant-Beute von der Firma Janisch bekommt. Den unteren haben wir heute
gebaut. Im Sommer werden wir den vergrößerten verwenden. Der kleine passt für den Herbst und Winter dann sicher wieder optimal..."
                };

                this.BlogItems.Add(newItem);
                await this.SaveChangesAsync();
            }

            if (!existingBlogIds.Contains(1))
            {
                var newItem = new BlogItem()
                {
                    BlogId = 1,
                    Title = "Es brummt im Bienenstock",
                    FeaturedImageUri = "http://bienenimgarten.files.wordpress.com/2013/06/dscf3078.jpg?w=500",
                    Content = @"
In einem unserer letzten Blogartikel haben wir berichtet, dass unsere Königin (die sogenannte Weisel) tot ist. Das war ein
herber Rückschlag, da wir nicht wussten, ob eine zweite im Volk ist. Heute haben wir tolle Neuigkeiten: Es ist so gut wie
sicher, dass unser Volk nicht weisellos ist. Herausgefunden haben wir das mit Hilfe unseres Imkereivereinobmanns. Wir haben
gemeinsam den Stock geöffnet und uns die Brut angesehen. Die tote Königin haben wir vor ziemlich genau einer Woche gefunden.
In den Wabenzellen fanden wir aber gestern sowohl Eier als auch Bienenlarven, die teilweise erst wenige Tage alt waren. Das ist
nur möglich mit einer aktiven Königin..."
                };

                this.BlogItems.Add(newItem);
                await this.SaveChangesAsync();
            }
        }
    }
}
Last but not least don’t forget to change the database connection string in your web.config file accordingly. I will use Microsoft’s LocalDB as it comes with Visual Studio out of the box:
  <connectionStrings>
    <add name="BlogDatabase" providerName="System.Data.SqlClient" connectionString="Data Source=(localdb)\V11.0;Initial Catalog=BeeInGarden;Integrated Security=True;Connection Timeout=10" />
  </connectionStrings>
Please add the connection string to the test project’s App.config file, too. We will need that in a minute.
Step 3: Add Async Web API
The project template for ASP.NET MVC 4 Web APIs adds a sample API controller called ValuesController. For our purposes we can rename it to BlogController and change its implementation as follows:
using BeeInMyGarden.Data;
using System.Data.Entity;
using System.Linq;
using System.Threading.Tasks;
using System.Web.Http;

namespace MvcApplication2.Controllers
{
    public class BlogController : ApiController
    {
        // GET api/values/5
        public async Task<BlogItem> Get(int id)
        {
            // Open context to underlying SQL database
            using (var context = new BlogContext())
            {
                // Make sure that it contains database
                await context.GenerateDemoDataAsync();

                // Build the query
                var blogs = context
                    .BlogItems
                    .Where(b => b.BlogId == id);

                // Execute query
                return await blogs.FirstOrDefaultAsync();
            }
        }
    }
}
The important point in this code snippet is the fact that the Get method is marked with async. It has to be async because it uses await to work with our data access layer’s async methods. We have already learned above that an async method has to return a Task. In our case it has to be a Task<BlogItem> because the synchronous pendant or our Web API would return a BlogItem object.
Step 4: Test It
Finally we have to test our Web API. Of course we do not only try it in the browser. We write a unit test instead. It turns out that the latest version of Visual Studio works perfectly fine for unit testing async methods. Again we change the implementation of the generated ValuesControllerTest class as follows:
namespace MvcApplication2.Tests.Controllers
{
    [TestClass]
    public class BlogControllerTest
    {
        [TestMethod]
        public async Task GetById()
        {
            BlogController controller = new BlogController();

            var result = await controller.Get(1);
            Assert.IsNotNull(result);

            result = await controller.Get(99);
            Assert.IsNull(result);
        }
    }
}
The important point here is that the test method is marked as async Task. Visual Studio’s test engine recognizes this method as an async test and will behave accordingly. Run your test and you will see that everything works nicely.
Step 5: Deploy It
Our implementation is ready to run in the cloud. In order to try it you need a Windows Azure subscription which you can get from http://www.windowsazure.com. If you are new to Widows Azure, you can try your first steps with the free offer or with the free resources you get as part of your MSDN subscription.
Here is a checklist what you have to do to run the Web API in Windows Azure:
- Open the Windows Azure management portal at https://manage.windowsazure.com.
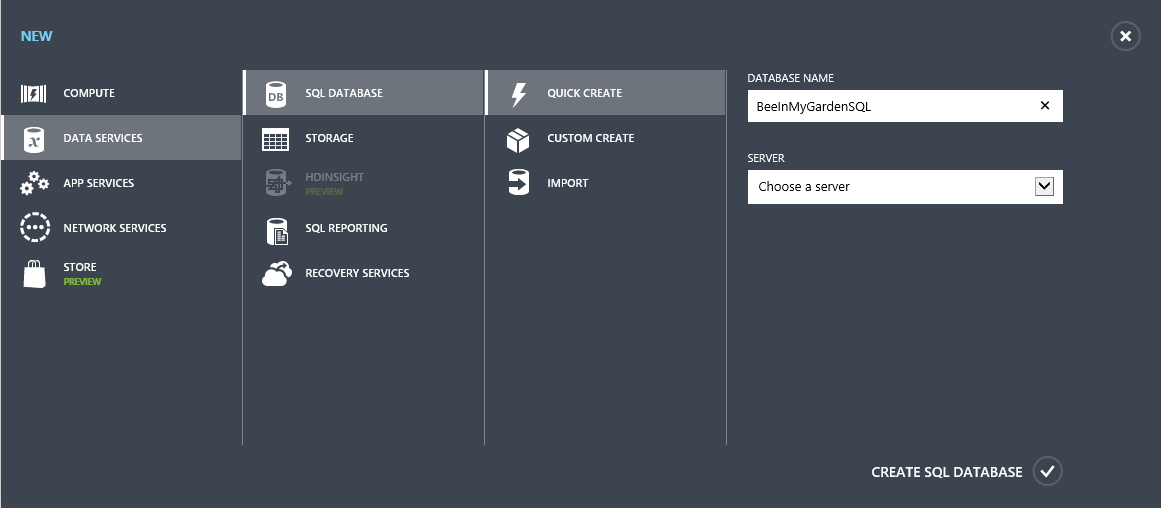
- Create a Windows Azure SQL Database that you can use for storing the blog posts.
- Create a Windows Azure Website to which you can deploy your project.
- Link the Windows Azure Website with the database created in step 2. This will help you during deployment.

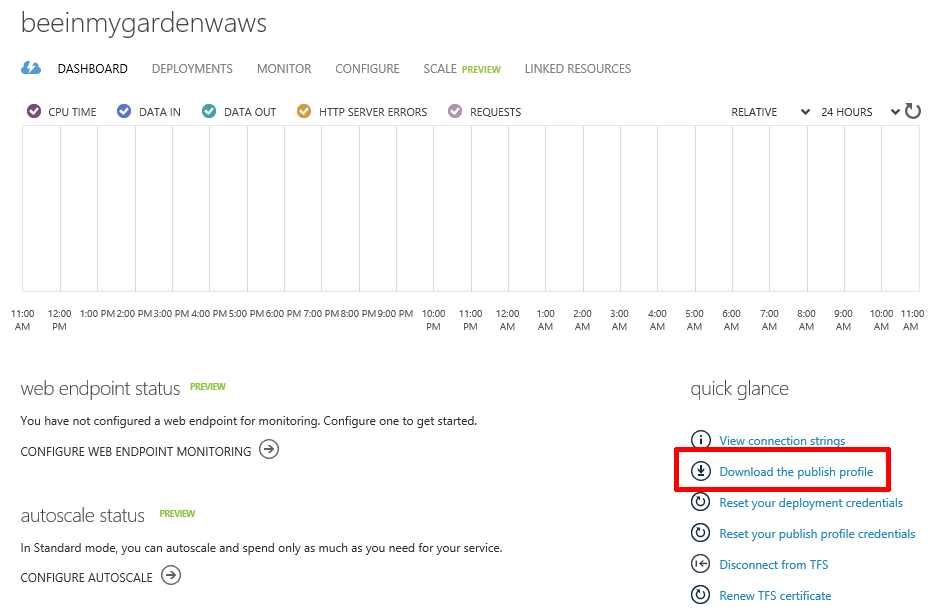
- Download the publish settings file for your Windows Azure Website.
- Right-click your MVC project and select Publish.

- Import the publish settings you downloaded from Windows Azure.
- During deployment you can change the database connection string in your web.config file so that it does no longer point to your local database but to the SQL database in the cloud that you created in step 2.
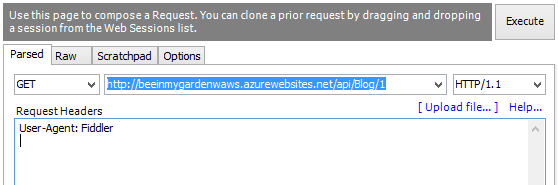
Complete the publishing wizard, wait a few seconds and you can try your Web API in the cloud. I usually use Fiddler for this. Here you see the request in Fiddler:
And this is how the JSON response looks like in Fiddler:

Async UI Programming
Now that we have built and deployed the async Web API, we could consume it in a Windows app. To keep things simple I will show you some WPF code. You could do exactly the same in a Windows Store app.
On the server side we used async programming to raise efficiency. On the client side we use async typically to keep our app responsive. The UI thread should not be blocked for a longer time. All high latency operations must be done in background threads. Only the UI interaction code should run on the UI thread. The good news is that .NET async keyword brings us back on the UI thread after the background task if we used it in the UI thread originally. Therefore we can just use async and we do not have to bother with explicitly switching to the UI thread.
The following very simple code snippet shows a typical view model used for a Windows app. In order to keep the amount of code I have to write as small as possible, I used the Prism library for MVVM and Json.net for parsing the Web API's JSON result.
using BeeInMyGarden.Data;
using Microsoft.Practices.Prism.Commands;
using Microsoft.Practices.Prism.ViewModel;
using Newtonsoft.Json;
using System.Net;
using System.Windows.Input;

namespace WpfApplication3
{
    class MainWindowViewModel : NotificationObject
    {
        public MainWindowViewModel()
        {
            this.GetBlogPostCommandValue = new DelegateCommand(
                this.OnGetBlogPostAsync, () => !this.IsLoading);
        }

        private async void OnGetBlogPostAsync()
        {
            this.IsLoading = true;

            using (var client = new WebClient())
            {
                var result = await client.DownloadStringTaskAsync("http://beeinmygardenwaws.azurewebsites.net/api/Blog/1");
                var blogItem = await JsonConvert.DeserializeObjectAsync<BlogItem>(result);
                this.BlogItem = blogItem;
            }

            this.IsLoading = false;
        }

        private DelegateCommand GetBlogPostCommandValue;
        public ICommand GetBlogPostCommand { get { return this.GetBlogPostCommandValue; } }

        private bool IsLoadingValue;
        public bool IsLoading
        {
            get
            {
                return this.IsLoadingValue;
            }

            set
            {
                if (this.IsLoadingValue != value)
                {
                    this.IsLoadingValue = value;
                    this.RaisePropertyChanged(() => this.IsLoading);
                    this.GetBlogPostCommandValue.RaiseCanExecuteChanged();
                }
            }
        }

        private BlogItem BlogItemValue;
        public BlogItem BlogItem
        {
            get
            {
                return this.BlogItemValue;
            }

            set
            {
                if (this.BlogItemValue != value)
                {
                    this.BlogItemValue = value;
                    this.RaisePropertyChanged(() => this.BlogItem);
                }
            }
        }
    }
}
Note especially the implementation of OnGetBlogPostAsync. It uses .NET's task-based API for accessing the web service. The method starts on the UI thread. As mentioned before, .NET will return on the UI thread after each await. Therefore we do not need to call Dispatcher.BeginInvoke.
For completeness here is the XAML code that uses the above view model. I kept it really simple because it is for demonstration purposes only.
<Window x:Class="WpfApplication3.MainWindow"
        xmlns="http://schemas.microsoft.com/winfx/2006/xaml/presentation"
        xmlns:x="http://schemas.microsoft.com/winfx/2006/xaml"
        Title="MainWindow" Height="350" Width="525">
    <Window.Resources>
        <BooleanToVisibilityConverter x:Key="BoolToVisConverter" />
    </Window.Resources>
    <DockPanel>
        <Button DockPanel.Dock="Top" Command="{Binding Path=GetBlogPostCommand}">Load</Button>
        <Grid>
            <TextBox Text="{Binding Path=BlogItem.Content}" />
            <Border Background="LightGray" Opacity="0.5" Visibility="{Binding Path=IsLoading, Converter={StaticResource BoolToVisConverter}}">
                <TextBlock Text="Loading..." HorizontalAlignment="Center" VerticalAlignment="Center" />
            </Border>
        </Grid>
    </DockPanel>
</Window>
Summary
Efficient use of use of resources like CPU and memory is even more important in the cloud as it is on premise because it directly influences your variable costs. Visual Studio 2012 and .NET 4.5 make it very simple to create async Web APIs and async unit tests. They will make it simple to get the most out of Euros you spend for Windows Azure.
Futher Reading
Content