.NET Core Session at devone
01 June 2017 - .NET
![]()
Introduction
Today, I will do a session about .NET Core at the premier of the devone conference in Linz. In this blog post I share my samples and important links.
Slides
If you prefer PDF (with working links), here are the slides to download.
.NET Standard Sample
Create a class library based on .NET Standard 1.4. Here is a sample class that you can use. Note that it uses Json.net. You have to add a package reference to it.
using Newtonsoft.Json;
using Newtonsoft.Json.Linq;
using System.IO;

namespace StandardLibrary
{
    public class JsonHelper
    {
        public JObject Parse(string text) => (JObject)JsonConvert.DeserializeObject(text);

        public string Read() => File.ReadAllText("test.txt");
    }
}
Next, create a .NET Core 2.0 console client, reference your class library and write some code using it:
using StandardLibrary;
using System;

namespace JsonCoreClient
{
    class Program
    {
        static void Main(string[] args)
        {
            const string text = "{ \"foo\": \"bar\" }";
            var h = new JsonHelper();
            dynamic result = h.Parse(text);
            Console.WriteLine(result.foo);
        }
    }
}
Try it, it should work perfectly fine.
Now create a .NET full framework console client and reference your class library. Use a slightly extended version of the code shown above:
using StandardLibrary;
using System;

namespace JsonFullClient
{
    class Program
    {
        static void Main(string[] args)
        {
            const string text = "{ \"foo\": \"bar\" }";
            var h = new JsonHelper();
            dynamic result = h.Parse(text);
            Console.WriteLine(result.foo);

            Console.WriteLine(h.Read());
        }
    }
}
This time, it is not sufficient to add a reference to Json.net. You also have to reference System.IO.FileSystem. During the session I will describe in details why this is necessary.

Build your app and open the System.IO.FileSystemd.dll from your bin/Debug folder with dnSpy or ildasm. Do you find the assembly redirects?

.NET Core 2.0 Samples
Choose CLI Version
I assume that you work on a machine with .NET Core 1.1 RTM and .NET Core 2.0 Preview installed. Check C:\Program Files\dotnet\shared\Microsoft.NETCore.App to see all versions of .NET Core installed on your machine.
Open a command shell and run dotnet --info. You should see that you work with the .NET Core 2.0 Preview version of the CLI.
Now create the following global.json file in an empty folder:
{
  "sdk": {
    "version": "2.0.0"
  }
}
Run dotnet --info again. Now you are back in the RTM CLI. Note that .NET Core looks in the current folder and in all parent folders for global.json.
Reference Full Framework Assembly from .NET Core 2.0
First, create a full framework class library. Here is a sample class that you can use:
using System;
using System.Diagnostics;

namespace FullFrameworkLibrary
{
    public static class MathHelpers
    {
        public static int Add(int x, int y) => x + y;
        public static int Sub(int x, int y) => x - y;
        public static int ComplexMath(int x, int exp)
        {
            if (exp < 0) throw new ArgumentException("Negative exponent not supported", nameof(exp));
            if (exp == 0) return 1;

            var result = x;
            var sw = Stopwatch.StartNew();
            for (; exp > 1; result *= x, exp--) ;
            sw.Stop();
            Debugger.Log(0, "Demo", $"Calc. Duration ${sw.Elapsed}");

            return result;
        }
    }
}
Next, add a .NET Core 2 console app to your solution. Take a look at your .csproj file. Note the target framework netcoreapp2.0:
<Project Sdk="Microsoft.NET.Sdk">

  <PropertyGroup>
    <OutputType>Exe</OutputType>
    <TargetFramework>netcoreapp2.0</TargetFramework>
  </PropertyGroup>

</Project>
Try adding a reference from your .NET Core 2 app to the full framework class library. It should just work. So as long as your class libraries only use SDKs that are part of .NET Standard 2, you don’t even have to recompile it :-)
Change the target framework to netcoreapp1.1 and try to compile your solution. It doesn’t work. So that is a new capability coming with .NET Core 2.
Remove the reference to the full framework project. Instead, add a reference to the full framework DLL (use the Browse… button in Visual Studio’s Add Reference UI):
<Project Sdk="Microsoft.NET.Sdk">

  <PropertyGroup>
    <OutputType>Exe</OutputType>
    <TargetFramework>netcoreapp2.0</TargetFramework>
  </PropertyGroup>

  <ItemGroup>
    <Reference Include="FullFrameworkLibrary">
      <HintPath>..\FullFrameworkLibrary\bin\Debug\FullFrameworkLibrary.dll</HintPath>
    </Reference>
  </ItemGroup>

</Project>
Run your app and make sure it still works.
Now we want to try it on Linux. Yes, we run .NET full framework code on Linux. I will use Microsoft’s ready-made .NET Core Docker image for that (note that you have to change the paths accordingly): docker run -it --rm -v //c/temp/netcore2preview/NetCore2PreviewDemo:/app -w /app microsoft/dotnet:2-sdk /bin/bash. Run dotnet restore and dotnet run. It should just work :-)
Stay in the Docker container for another second. Let us create a self-contained executable for Linux using the full framework library. For that, add RuntimeIdentifiers to your project:
<Project Sdk="Microsoft.NET.Sdk">

  <PropertyGroup>
    <OutputType>Exe</OutputType>
    <TargetFramework>netcoreapp2.0</TargetFramework>
  </PropertyGroup>

  <PropertyGroup>
    <RuntimeIdentifiers>win10-x64;debian.8-x64</RuntimeIdentifiers>
  </PropertyGroup>

  <ItemGroup>
    <Reference Include="FullFrameworkLibrary">
      <HintPath>..\FullFrameworkLibrary\bin\Debug\FullFrameworkLibrary.dll</HintPath>
    </Reference>
  </ItemGroup>

</Project>
Run dotnet restore again. After that, you can create the self-contained executable using dotnet publish -r debian.8-x64. Change into the publish folder and run your app using ./NetCore2Console. It works :-)
ApiPort Tool
The .NET Portability Analyzer (aka ApiPort) is a great tool to check whether your existing assemblies work with .NET Standard.
Let’s get and build ApiPort:
git clone https://github.com/Microsoft/dotnet-apiport.git
cd dotnet-apiport
build.cmd
Now let’s run it against the full framework DLL we created in the previous sample (you have to change the paths accordingly): dotnet .\bin\Release\ApiPort\netcoreapp1.0\ApiPort.dll analyze -f "C:\temp\netcore2preview\NetCore2PreviewDemo\FullFrameworkLibrary\bin\Debug\FullFrameworkLibrary.dll"
As a result, you will get a report in ApiPortAnalysis.xlsx. Open it in Excel and you will see that our library would currently require .NET Standard 2.0+. The reason is the method System.Diagnostics.Debugger.Log.
Try commenting out the method ComplexMath in our library. Build it and run ApiPort again. Now you will see that our library would work with a .NET Standard version that is RTM today.
.NET Core Linux Remote Debugging
-
For this demo, I set up an Ubuntu machine in Azure. Make sure that you either remove the Network Security Group or open the necessary ports (in particular SSH and port 5000 for sending test requests to Kestrel).
-
Next, I installed .NET Core for Ubuntu.
-
Create a new, empty ASP.NET Core 1.1 application in Visual Studio 2017 Preview. Build and test it on Windows. Don’t forget to change Kestrel’s port by adding
.UseUrls("http://*:5000")toProgram.cs. -
Move the application to the Linux server (e.g. scp, FileZilla).
-
Use
dotnet restoreanddotnet runto start the application on Linux. -
Use Visual Studio’s SSH-support in Attach to process… to connect to your Ubuntu server.
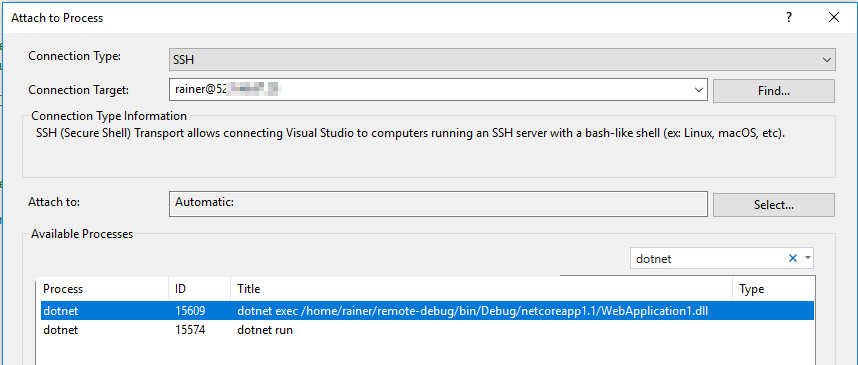
-
Set a breakpoint in
Startup.cs, open your web app in a browser (port 5000), and your debugger should break :-) -
Run
ps -A | grep vsdbgon Ubuntu to find debugger process that has been launched -
Run
sudo ls -l /proc/11111/exe(note: change 11111 to the PID of the debugger process) and you will see where Microsoft’s Debugger has been installed.
Note that this debugger must not be used with non-Microsoft products (see license.txt in the debugger’s installation folder for details).
Content

Tags
.NET (40) ADC (1) Android (1) Angular (4) AngularJS (3) ASP.NET (7) ASPNET Core (1) ASPNET (1) Assembler (1) Azure (62) BASTA (2) Blazor (2) C# (35) C (1) CLI (2) Cloud (1) CoderDojo (1) Conferences and Workshops (2) Container (4) CPP (3) CSharp (5) DevOps (2) Docker (12) Documentation (1) DotNet (1) ECMAScript (1) GAB (1) HTML (2) HTML5 (2) Iron Python (1) JavaScript (3) JWT (1) Markdown (1) MEF (3) Microservices (3) Microsoft (2) Minecraft (2) Mobile (2) Node (1) Node.js (2) NPM (1) OData (5) Presentations (4) Project Management (2) Registry (1) Roslyn (2) Silverlight (3) Software Quality Days (1) SPA (1) SQL (3) SQLCE (1) SVG (1) TechDays (1) Techorama (1) Testing (1) TFS (9) time cockpit (4) TypeScript (18) Visual Studio (37) VSCode (1) VSTS (2) WebAssembly (2) Windows (1) WPF (9) Yarn (1)Authors
Related Posts

TechDays Sweden 2017 - Dockerizing .NET Apps
26 October 2017 - .NET, Docker, Microservices, TechDays
Yesterday, I did a session about Dockerizing .NET applications at TechDays Sweden. In this blog post, I share a recording of my talk and the slides that I used.

BASTA 2017 - Recordings and Session Material
27 September 2017 - BASTA, .NET, Docker, Microservices, Visual Studio, Yarn, NPM
September is BASTA! time. It has become a beloved tradition for me to travel in Autumn to Mainz to speak at the BASTA! conference. This year, my workshop, session and keynote topics were .NET, microservices and web dev technology. In this blog post I share my session material and recordings.